| I'm Bugging Out! |
|---|
This is the last of 228 posts. I never did like the Followers Gadget. The Followers (you and a few others) might have been very nice, but not via the clammy tentacles of Blogger's bug-eyed "friends" toy! All my "old friends" can testify that I'm pretty anti-social.So now that I'm abandoning MFBQ, I just thought I'd mention that this blog will still be here, but there will be no new posts after this one. It is hard to say this because I've become so addicted to writing the blog. But I was meant for other things. I might make noise from time to time over at The Rat Squeaks. Last one out, turn off the light! |
Friday, June 19, 2009
The Last Post: Note to Followers

Saturday, June 06, 2009
Remove Blogs You Follow from Dashboard's "Reading List"
How to remove titles from "Blogs I'm Following" in the "Reading List" below the Dashboard list of your own blogs:
|
Thursday, June 04, 2009
WYSIWYG Instead of Preview
| Many Bloggers are unhappy about the Blogger notion of Preview. They do not like either the one in the template or the one in the html editor. Many are dissatisfied with the Compose mode of the Blogger Editor being only an approximation of the appearance of the published post. There is no "What You See Is What You Get", they think. So how does one wiggle past this problem? My solution is to create a private "practice blog" where the template is exactly the same as in The Real Blog. All the Styles created in the CSS section will be identical and the "published" posts in The Fake Blog will look EXACTLY like they will look in The Real Blog. This will leave you free to start with a rough draft (but one that you can Publish right away and see how it looks!), to make various revisions, and, lastly, achieve the polished post. All this work can occur in the private blog and no one will have access to see that post while you're fumbling around with it in The Fake Blog. When you copy it later and paste it into The Real Blog, you can Publish it for real and be back in the normal public view. WARNING: Name your practice blog so that it can't be confused with The Real Blog at any time! Avoid having both blogs open at the same time.
Remember this is a Practice blog for Posts and it doesn't matter if the Widgets or the Gidgets get deleted! Here again, it's important to not be confused about which blog you have open in front of you! If later you want to work like crazy to re-create all the Page Elements, that's up to you. I just figure the sidebar is generally very monolithic, very unchanging once you like it. The WYSIWYG for it is less important than for the posts, that's my view. (And there is a Preview button on the Layout page that lets you view the rearranged gadgets before you Save.) |
Friday, May 29, 2009
When Header Image is Stuck, Won't "Remove"
| When the blog header image you decided you don't like after all won't let itself be removed, what are you supposed to do? People say their photo is stuck there and won't be removed! I believe them, but I've barely had it happen to me, so my experience has been of small proportions! I only had a stuck header image once. What did I do? I panicked, of course. WHAT was it doing? So I tried everything that I ever heard of or could vaguely imagine might work!.
I did break it loose at last, but not before I'd gotten so flustered that I very unscientifically lost track of the order in which I did all these things. I can't even guess which one really "fixed" it. I nearly feel that it just gave up when it saw how hard I was going to work at it! (You can see how insensible it made me!!!)
After either the short or the long list, I can only hope that you can finally remove the header image (replace it, too, if that's what you'd meant to do!). In my case, I ended up with a new Header Gadget with no image as I'd expected. I was then able to put a new image in the header, remove it, replace it (just to see if it would!). But I had no way of knowing that if it had originally been stuck, would the next attempt to add an image also stick?! This may be the problem, the "rub"--I had to test this (all 3 times) without a "stuck" header! So I wish you great Good Luck. You may learn a number of new things, but I can't promise any success! If anyone tries this, let me know if it fails or succeeds! |
Thursday, May 28, 2009
Template Corruption
PROCEED WITH THIS AT YOUR OWN RISK!
Though it's not very hard to do, it may be like killing flies with a shotgun. Be aware that it may correct or change, not only the "broken" or missing item you're concerned about, but some other things you have forgotten that you changed or added! When the post template is "reset", some items you added in the post area (not content) may disappear and you'll have to do some work to put it back.
This procedure surprised me when it eliminated the coding I'd done that placed one cartoon image near the end of each post and another "divider" image at the very bottom of the post. Also, the image signature (my initials in script) in the "Posted by" will have to be replaced in one of my other blogs. I'm in no hurry.
[The same sort of warning may apply to the link you find below the "Edit Html" box that says "Revert widget templates to default". I have not yet used this button, mostly because I have a lot of gadgets that I've edited and I worry that the revert (like this one) might fix too much! But certainly I have read where some people said it had worked for them.]
| Missing Post Template Components | ||
|---|---|---|
Nitecruzr has already done a good job, I think, on explaining this little fixit, so I've added notes and direct you to his post also called Template CorruptionThe only significant addition I can make is to show the code line in another way so that you can be certain of what you're intended to delete and then replace in his directions. [More below...]
It is the line of code in red that I removed and later replaced. (See further important details at Chuck's post.) Make sure that you made a note of where in your code you removed the red line of code! If you can't put it back in the right place, you may beat your head against the wall trying to remember (ouch!). If you were really familiar with this blog, you'd notice the Email envelope icon has returned below each post for the first time in ages! |
Wednesday, May 27, 2009
Captioned Photos In A Small Table
Below in red is the code for the two small tables shown above. The style definition NOBR is invoked to prevent a pile of line breaks on top of the table, which is something I use for every table. There are also some artificial line breaks that had to occur in the long url's; this was done to prevent the table margins from getting wacky! <div class=nobr> <table border=2> <tr> <td>PICTURE1</td> <td>PICTURE2</td></tr> <tr> <td>Caption1</td> <td>Caption2</td></tr> </table> </div> <div class=nobr> <table border=2> <tr> <td><img src="http://3.bp.blogspot.com/ _AVxLoZ0mR_0/R0tYGSDQasI/AAAAAAAAAcI/ fNyWP--ziLI/s1600/twinkiebite.gif" /></td> <td><img src="http://3.bp.blogspot.com/ _AVxLoZ0mR_0/R0tYGSDQasI/AAAAAAAAAcI/ fNyWP--ziLI/s1600/twinkiebite.gif" /></td></tr> <tr> <td align=center>Caption1</td> <td align=center>Caption2</td></tr> </table> </div> |

Monday, May 25, 2009
Place Gadget Above The Posts?
| It's sometimes possible to create a page element and then slide it across (drag and drop) the blog and drop it above the posts. If that won't stick, you may have to find this line in your "edit html" (template): <b:section class='header' id='header' maxwidgets='1'> and change the maxwidgets number to 2. Don't neglect to Save template before you return to the Layout page. Now you should be able to "Add a gadget" from above the header. Then you can drag and drop that new Page Element below the header, where of course it'll be above the posts. |
Saturday, May 23, 2009
Add Line or Divider Between Posts
| Directions, for white or black minima: Make a safety copy of your template as per the instructions on the "Edit html" page. I can't guarantee that all blog codes are going to look the same, but I did this on several of the Minima templates. I've done it on a couple of other template styles and they varied a little. So it might work right away or you might have to tinker! (Note: You can see the blue divider I talk about here at the end of all my posts.)
src='http://bp2.blogger.com/_AVxLoZ0mR_0/R3-8aw3SxjI/ AAAAAAAAAnM/Z3AlnL1FsMY/s400/bluedivider-b.gif'/></center> <div class='post-footer-line post-footer-line-3'> |
[More below...Harbor example, etc.]
| In a Harbor template I placed the same blue-divider gif in the footer as above, just before the (almost) same red line of code about "post-footer-line-3". <p class='post-footer-line post-footer-line-2'> <span class='post-labels'> <b:if cond='data:post.labels'> <data:postLabelsLabel/> <b:loop values='data:post.labels' var='label'> <a expr:href='data:label.url' rel='tag'><data:label.name/></a><b:if cond='data:label.isLast != "true"'>,</b:if> </b:loop> </b:if> </span> </p> <center><img src='http://bp2.blogger.com/_AVxLoZ0mR_0/R3-8aw3SxjI/AAAAAA AAAnM/Z3AlnL1FsMY/s400/bluedivider-b.gif'/></center> <p class='post-footer-line post-footer-line-3'/> </div> |
When you make the change or addition, use Preview to see if it's what you think it's going to be. Wait until you're satisfied to save it. You can always "clear edits" and back out if you're not confident.
Bla bla bla, says the post!
LAZY WAY TO ADD A LINE:
I used to include <hr color=crimson> in my post template code so that a crimson line would be drawn during creation of the blank post and I'd then write my post above the crimson line. This was easier than adding a line or image to the footer widget, so a beginner might be attracted to it just for the ease of it. Some day all beginners stop being nervous about getting into the template, but it doesn't have to be today! I remember the feeling.
NOTE: additional graphics at http://www.graphics-4free.com/
Tuesday, May 12, 2009
More than 20 Important Sticky Posts
I tried to go back through the blog and find those twenty Most Frequent Blogger Questions and their answers, but I can't quite limit it that much! Some on this list may be of NO importance to you and certainly there are some good ones left out because they just aren't asked for very often. Maybe it's sufficient that this is a Short List compared to the more than 200 total! It is not in any order, alphabetical or otherwise.
Monday, May 04, 2009
Linking to a Google Doc From Blogger
| If you make a file in Google Docs and Spreadsheets, this is how to link to it from Blogger If you've created one document and saved it already, locate the url (web address) in the window above on your screen and copy it. Use the right-click button on your mouse and then the Copy on the small menu so that you don't make a typo. Then go back into the post or sidebar where you intend to keep the link and produce this: <a href="http:...documentLink">DocumentName</a> Paste the url that you already Copied into the above code, replacing everything between the quotation marks with the url. Keep the quotation marks, of course. The "DocumentName" is whatever name you choose to call it, whether a title or description. If you can succeed with one link, you can make a list of them, maybe using the ul or ol list or create a LinkList type Gadget. Neither one is very hard, though anything can be intimidating the first time you try (remember bicycles?). Unordered & Ordered Lists |
Friday, May 01, 2009
Remove a Message from Blogger Help Group?
| Yes, But Not Completely |
|---|
Sometimes you may "think better" and want to take your words back. Or maybe you solved it two seconds later and can't bear for the world to know how stupid you were. For any reason, good or bad, you can remove it. It is worth noting that those persons who have their membership options set to receive every message reply by email will still have gotten their copy and you can't call those back. Therefore, your message is hidden only from those who were not emailed and who read the messages on the Web.
|
Wednesday, April 29, 2009
Profile Views And "Real" Counters
| At present, a portion of the Blogger users are complaining that their "profile" numbers are not increasing or that they barely are. Blogger said that they changed it all due to problems such as hackers giving themselves all kinds of extra clicks. Anytway, the system was getting overloaded in some fashion. Evidently, it may now register numbers by larger increments, not one at a time. Whether or when Blogger may make a better "improvement" than that is unknown so far. Get a real counter like Site Meter or Statcounter. The "hits" on your Profile are like how many people saw your business card, but a real counter would track how many people visited your actual "store" (blog)! It's the store visits that count, isn't it? Counting Profile Views is of a much lower order of importance. It's a shame that Blogger left it vague enough that some people never thought about the relative lack of meaning in the Profile numbers. It's too late to correct that damage, but I advise that people shrug it off and get one of the real counters Many are free. |
GATSBY'S EXPLANATION
Monday, April 13, 2009
NEW Undelete Button on Dashboard!
| Getcher Blog Back!--Maybe |
|---|
| There has been an astonishing development in Blogger--it is, to me, at any rate! Until recently, there was no official feature with which to retrieve or recover a deleted blog. Now we can undelete those blogs that we accidentally deleted! Someone is always having that problem for all kinds of reasons, some of which are pathetic and some of which are our own fault, but FINALLY Blogger has a feature that will let us push a button and Undelete our mistake! At present, I know that it worked on a very small blog that I'd deleted only a few minutes before, but that's a start. It may do just as well on larger blogs or on blogs deleted last month--it's just too new for me to know yet all of how it works! My understanding is that the "delete" has to have taken place within the last 90 days.
|
Below is the screenshot of the bottom of my Dashboard AFTER I clicked on "Show All". You can see that the bottom blog, "Spitting Out The Seeds Of Regret" (which I had deleted only a little earlier this same day) now shows in a ghostly print and has the "Undelete this blog" link out to the right side of it.

Screenshot of Dashboard list AFTER undeleting the bottom post shown above--of course, in my case, I had to click "Show All" yet one more time because it had reverted to the shorter list I usually keep visible:

After this stage, the blog that had been deleted HAD been successfully Undeleted and ALL of it was intact, including the four posts that had been there. This is how it's supposed to work, but I repeat that I have not yet had the experience of undeleting either a VERY LARGE blog or one that was deleted six months ago.
Wednesday, April 08, 2009
Where's My Questions in Blogger Help Group?
| Is There A List of Questions? |
|---|
| How do I find ALL the questions I have asked in BHG? Right up there where you just asked that question (when we're in one of Blogger Help Group's conversation "threads"): There's your Forum "name" and to the right of it is a link, "View profile", which will show some biographical info from your BHG Profile and it includes "Recent Activity", which will list every thread (whether 2 or 2000 of them) where you left a question or answer in the past. It is not ideal, but it is complete, and you can slowly go back through them. This may be stating the obvious, but if you're new and feel like you don't have a starting place for this, ask a new question or make a remark and after you publish, you'll be right there to click on "View Profile"! |
[More below...screenshots, etc.]
There are other ways to search, with Google or other search engines, but the method described first up above is the "official" way of locating and reviewing all your old threads.Also see this post about Gold Stars in BHG.
Screenshot of BHG question-and-answer:
 Screenshot of "View Profile":
Tuesday, March 31, 2009
Text Indenting in Paragraphs
See the post after this about Blogs Disappear to see more results of using the text-indent.
| Step One Occurs In The Template |
|---|
| Every once in a while, someone asks how to indent a paragraph and overcome the habit HTML has of not recognizing more than one space in a row! In your template's CSS, place this line: .p2 p {text-indent: 25px;} Don't ignore the "." in front of p2 above; it's only needed that once. The "p2" is an arbitrary name. You could name yours "piddle" or "Ralph". That instruction is telling the p2 style that an opening paragraph tag should have that much of an indentation. You could increase or decrease the number. Save your template so that it'll have this new instruction at hand. Only this paragraph of this post is indented. When you next write a post, every "paragraph" should have the paragraph start tag! As far as I know, it's the only way for the system to know that it's supposed to be a paragraph. Once it knows that fact, it knows to follow the style instruction and make a text indentation of that specified (25px) width. |
| Step Two Occurs In Every Post |
|---|
| The instruction that tells your blog to apply that rule is when you surround your post with an open and close "div" tag like so: <div class=p2> text </div> |
Monday, March 30, 2009
Blogs Disappear
| Like Socks In The Dryer? |
|---|
Come Back, Black Sheep! One of the silliest and yet one of the most efficient ways of "losing track of a blog post" happens when one is not quite paying attention. It has happened to me three or four times now and even now that I know to suspect it, it still mostly catches me by surprise. Sometimes as I “publish” and exit the program, my fingers slip and seem to stumble and slide over an extra key. I’m never sure what I did! But when I “view” my blog, today's post isn’t there. Whatever happened, I have since learned the end result; today's post date has changed! I’ve learned to use the Search feature and hunt the title down. Sure enough, it turns up easily enough, except that instead of being at the top of the blog, the date has changed and now it’s on the page for some previous month, possibly even for some previous year. The post that doesn’t exist! That post is pretty thoroughly hidden, if you don’t know to look there for it! So I edit the post again and correct the date. When I Publish this time, I’m more careful with my butterfingers. There’s today's post at the top of the blog, right where it’s supposed to be. You don’t have to be a genius to solve the Disappearing Blog Act, you just have to remember that the trick exists and how it works! |
Monday, March 23, 2009
Where To Find 3 or 4 Column Templates
| If You Want More Than 1 Sidebar! |
|---|
| This is just a place-holder for me for now in case I someday have something to say about the damn three and four column templates. At present, I haven't even read all of the posts that our friend Peter has written about it, listed below in these template posts by Peter. |
Friday, March 13, 2009

Friday, March 06, 2009
Speaking To A Newbie About Blogger Support
|
Saturday, February 21, 2009
Have Two or More Blogger Profiles
| Make Your Own |
|---|
Placing direct information and a photo into the sidebar to replace the Blogger "About Me" Profile OR because you want more or different info/pictures in your profile! You may desire to put hyperlinks or other items there which you cannot place in the official Profile. For different reasons, some people even want to be able to have a different Profile on different blogs on the same account. This is a workaround to achieve that goal. By placing the code for an image and your own personal info directly into the sidebar or page element, AND by suppressing the Blogger Profile, you can work around the problem. You'd have to eliminate the Blogger Profile entirely (mark it as NOT to be shared, either in Edit Profile or in the Profile page element). [Remember, these profile substitutes will only appear on your blog while the original official Profile will still be what's available to persons where you leave comments on other blogs!] |
[More below, with screenshot...]
First thing is to find a photo. My Blogger Profile pic is 88x68 pixels, but of course that's only how it shows in the sidebar. The photo size I submitted was 320x240 pixels. I don't currently know how much larger you can go, but I've seen some that were very large in other Profiles. Obviously, what we'll need in the sidebar is one of those pics such as Blogger pics turn out that are shown larger when clicked on.
For the test photo I use further down the page, I started with a medium photo in a photo program where I could copy it and resize the copy. Thus I had a thumbnail and a larger pic, as so many of us are used to.
My thumbnail here is larger (123x92)than the profile photo I actually use, but it fits in the sidebar, and that was my only goal. So I took the two photos and fitted them into the formula as below.
Once the images are hosted online, you can copy the code and place it in the sidebar, probably looking something like this:
<a href="PhotoUrl"> <img src="smallPhotoUrl" />
</a>
| Below is the actual code for the fabricated Profile I made up in a practice blog (shown further down the page). The code should be entered in an html/javascript page element in New Blogger or in the sidebar section of the template if you are still using a Classic template. |
<center><a href="http://4.bp.blogspot.com/_AVxLoZ0mR_0/Rc6Xl8IUJzI/AAAAAAAAALA/
BwKtMwuI4ek/s1600-h/Picture+17.jpg"> <img src="https://blogger.googleusercontent.com/img/b/R29vZ2xl/AVvXsEhtEqSABK9qbnoWe85CNI7_3Tmm2W03LckaXYS5Y25AX-gvh-gxWVfwBjvhSKRKxuyoMnyBrTipOk6t6lfFPbLU-iEIBtgn65v8u6lQGoLgT3QNw9wroOXqamloC-HoMbY1s29V/s1600/picture17-small.jpg"/> </a>
<br/>
<b>Clower McFlowers, <br/>
Chigger, Texas, USA <br/><br/></b></center>
Clower is a mean bastard, but he's our mean bastard! I can put whatever other info I want to include here. Might even insist that my name is Mortimer Snerd. Can't never tell. I was born in Montana. On horseback. In the rain. Yeah, that's it. And I'm a negro, too.
Below is the screen shot.

Friday, February 20, 2009
Can I Print My Blog To Paper?
| You can print your entire blog, including posts and comments, to paper if you wish. I never have done it and have no familiarity, so I'm sending you to NITECRUZR, my next-door Expert. |
Can I Save My Blog?
| The Export/Import Feature |
|---|
| You can save all, including photos, comments and posts, but excluding the template or Gadgets, by Exporting. This could also be viewed as a different form of BACKUP. I've only done this export/import 4 times so far, but it seemed pretty easy by just following the instructions under Settings --> Blog Tools. The shorter blogs copied very quickly, though the long one (more than 1800 posts) seemed to take a long time, then I decided it was hung up on a screen that showed a motion that meant the blog was still copying. I finally killed it, but then it turned out that the blog had fully copied--for all I know, it was possibly almost as quick as the short ones (180 posts) had been! NOTE: In one case, I Exported twice by accident and ended up with two copies of every post on that Destination Blog. I therefore conclude that the Export does not Overwrite what's already there. So if we make 3 or 4 "backups" over a period of time to the same Destination Blog, we'll have 2, 3, or even 4 copies of the various posts, depending on how long they've been on the original blog. This is neither harmful nor desirable; if it happens, just be aware that you'll just have to do some housekeeping some day in the future if you decide to use that Destination Blog. This is supposed to work between Blogger and these other platforms--export and import blog content between Blogger, LiveJournal, MovableType, and WordPress. I used the option that allowed all the posts to be published as they're copied, but apparently you can also NOT do that and later publish them selectively (one by one?). |
CLICK HERE FOR SCREENSHOT YOU'D SEE AFTER CLICKING THE "EXPORT" BUTTON.
| Just remember that the idea is to |
|---|
|
ALSO SEE BLOGGER'S ARTICLE.
[More below...screenshot of Blog Tools]

Wednesday, February 18, 2009
Body (Or Background) Color
The background color for your blog is not located with the other color changes in "Fonts and Colors". Oddly enough, to change the blog's background color requires going into the template--you'd think it would be among the other clickable changes. Some new bloggers may not like the idea of revising the template code, but eventually you will want something bad enough to dare! When the time comes for this change, look for a section resembling this below (from one of my other blogs):
[More below...]
body {
background:oldlace; url("http://www.blogblog.com/harbor/rocks.jpg") no-repeat right bottom;
background-attachment:fixed;
margin:0;
padding:0;
font:x-small Georgia, Serif;
color:$textcolor;
font-size/* */:/**/small;
font-size: /**/small;
}
or, similarly, this (from the code for this blog):
body {
background:#123;
margin:0;
text-align:center;
line-height: 1.5em;
font: x-small Trebuchet MS, Verdana, Arial, Sans-serif;
color:$mainTextColor;
font-size/* */:/**/small;
font-size: /**/small;
}
It's the "body" where you want to make the change or else create the color. Find or alter the color statement--whether you use a number or name doesn't matter. If you have to add the "background: color;", just be sure it's inside the brackets like you see in the two examples above.
See also my post about Fonts And Colors
END.
Saturday, February 14, 2009
Blogger Has N0 Email or Phone Support!
| WELL, DON'T GET BROKE UP ABOUT IT! |
|---|
| Blogger does not provide email-based support beyond the automated messages or give out telephone numbers. Not at Blogger Help Group (BHG) or much of anywhere else. [There is a fax number at Google's page about digital copyright and infringement. I assume if you fax them about off-subject concerns that those faxes may end up in the trash.] BHG is almost exclusively a forum where people ask questions about Blogger--then other, more experienced, "amateurs" try to answer them. Though a Blogger Employee may join the forum from time to time, it is not their 24-7 job to answer questions at BHG! Like you, I wish it was, but it isn't that way. Documents and other written help already exist at Blogger Help Group, so that's in addition to asking a question and hopefully getting answers from more experienced Bloggers. But that's it, as of this date. [More below...] I won't pretend that I can make it make sense to you. The bottom line is that IT IS THEIR FOOTBALL and if we don't like it, we can leave. They are never that rude when they make statements about their policies, but that's what it boils down to. They've obviously got the money, but they don't have enough time to piddle with each and every individual blogger. On this page of Blogger Help, it says: As you see, they think they DO provide email support, but since they generally won't answer your damn email, I would still say that they DO NOT. You can read another post about Blogger's support system at Nitecruzr's post on the subject |
Friday, February 13, 2009
Search for Blog Topics In Your Own Language
| How can users of NEXT BLOG solve the language problem? Many people only speak their own language and, while that is unfortunate, Next Blog is just wasting our time if it keeps sending us to what amounts to "foreign" language blogs to us! We should use the Google Blog Search for exploration instead of Next Blog.
|
Change Format Of Date Header
| Reset format of the date header At the top of all posts! |
|---|
|
Thursday, February 12, 2009
How To Post Photos
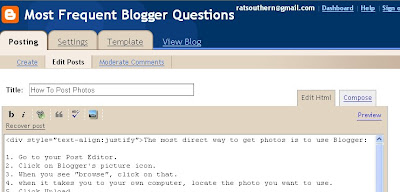
The most direct way to get photos on your post is to use Blogger's picture icon:
There are alternate free photo hosts such as Picasa, Photobucket, Flickr, etc. With some of them, costs may ensue if you exceed their limits. Try any of them, though, as alternatives when your photo host is troublesome. One may work when another one does not.
There are several useful screenshots below!
First is a screenshot of the top part of this post in the Post Editor. It shows the Blogger picture icon, the tiny rectangle that's blue in the top half, and primarily green in the bottom half.]
[Below are screen shots of the photo download process.]
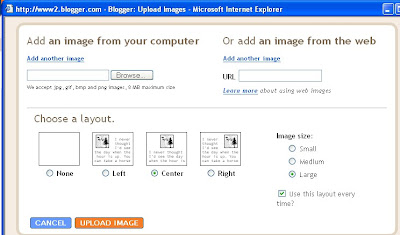
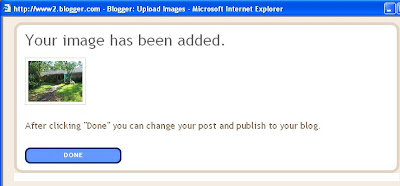
New images always load into a post at the top. If you view the image in Compose mode, you can Drag and Drop it to other locations; if you are viewing it in Edit Html mode, use Cut and Paste to relocate it.
END.
| 1. Go to your Post Editor. 2. Click on Blogger's picture icon. 3. When you see "browse", click on that. 4. when it takes you to your own computer, locate the photo you want to use. 5. Click Upload. 6. Click on Done. 7. If you uploaded to a post different from where it's intended to go, possibly even on a different blog, Copy the html code. 8. Paste the code into the right post. |
There are alternate free photo hosts such as Picasa, Photobucket, Flickr, etc. With some of them, costs may ensue if you exceed their limits. Try any of them, though, as alternatives when your photo host is troublesome. One may work when another one does not.
There are several useful screenshots below!
[More below...Screenshots]
First is a screenshot of the top part of this post in the Post Editor. It shows the Blogger picture icon, the tiny rectangle that's blue in the top half, and primarily green in the bottom half.]

[Below are screen shots of the photo download process.]
New images always load into a post at the top. If you view the image in Compose mode, you can Drag and Drop it to other locations; if you are viewing it in Edit Html mode, use Cut and Paste to relocate it.
END.
Sunday, February 08, 2009
Blogsend--Email Notification for 10 or Less
If you have a list of 10 or fewer people that you'd like to send email notifications of each time you publish a new post, here's how.
|
Saturday, February 07, 2009
Move Items Above Or Below Post
|
[More below...screenshots of the "Configure Blog Posts" page.]
Click each screenshot for larger image!


Tuesday, February 03, 2009
Most Erotic Blog Post Ever!
| This isn't really the most erotic blog post ever; I just thought I'd see who was awake this sleepy evening. If this isn't February 3, I guess you weren't. |
Thursday, January 29, 2009
Hide Blogs on the Profile List?
| How Can I Show Some, Hide Others? |
|---|
|
Sunday, January 18, 2009
Small/Large Photos
| "How do I get my pictures to enlarge when I click on them?" I don't keep track of all the other photo hosts, but Blogger downloads your photo in a sort of dual system so that a small image is made that fits the area (post or sidebar) and then you can click on it for the full-size large version. I used to do the same thing by hand when I made my own web sites by making both a small and large version of a picture and placing them in the format below. You can see it in the html code of your blog if you look at it in Edit Html mode; it will look something like this: <a href="http://2.bp.blogspot.com/ _AVxLoZ0mR_0/Rb_W1nLeYQI/AAAAAAAAAIg/ qCR5JYhLf6o/s1600-h/dgblues.jpg"> <img id="BLOGGER_PHOTO_ID_ 5025971925707284738" style=" DISPLAY:block; MARGIN: 0px auto 10px; CURSOR: hand; TEXT-ALIGN: center"alt="" src="http://2.bp.blogspot.com/_AVxLoZ0mR_0/ rb_W1nLeYQI/AAAAAAAAAIg/qCR5JYhLf6o/ s400/dgblues.jpg" border="0" /></a> If you click the small image (the blue text above) you'll see the large photo (red text above), otherwise the small image is already showing. END. |
Monday, January 05, 2009
Change Color, Font, And Size of Text
| When you select "Fonts and Colors" on the Layout page, "Text color" is the first in the vertical list, but "text font" is further down (sixth on my list); if you click on that link, a list of fonts (not previously showing) should appear in place of the color boxes out to the right. Furthest to the right are boxes to check for Smaller, Larger, Bold, and Italic. If you still aren't seeing what you expect, never underestimate the value of "clearing the cache and cookies" to update your screen. |
Subscribe to:
Posts (Atom)


