| It's sometimes possible to create a page element and then slide it across (drag and drop) the blog and drop it above the posts. If that won't stick, you may have to find this line in your "edit html" (template): <b:section class='header' id='header' maxwidgets='1'> and change the maxwidgets number to 2. Don't neglect to Save template before you return to the Layout page. Now you should be able to "Add a gadget" from above the header. Then you can drag and drop that new Page Element below the header, where of course it'll be above the posts. |
Showing posts with label post. Show all posts
Showing posts with label post. Show all posts
Monday, May 25, 2009
Place Gadget Above The Posts?

Saturday, May 23, 2009
Add Line or Divider Between Posts
| Directions, for white or black minima: Make a safety copy of your template as per the instructions on the "Edit html" page. I can't guarantee that all blog codes are going to look the same, but I did this on several of the Minima templates. I've done it on a couple of other template styles and they varied a little. So it might work right away or you might have to tinker! (Note: You can see the blue divider I talk about here at the end of all my posts.)
src='http://bp2.blogger.com/_AVxLoZ0mR_0/R3-8aw3SxjI/ AAAAAAAAAnM/Z3AlnL1FsMY/s400/bluedivider-b.gif'/></center> <div class='post-footer-line post-footer-line-3'> |
[More below...Harbor example, etc.]
| In a Harbor template I placed the same blue-divider gif in the footer as above, just before the (almost) same red line of code about "post-footer-line-3". <p class='post-footer-line post-footer-line-2'> <span class='post-labels'> <b:if cond='data:post.labels'> <data:postLabelsLabel/> <b:loop values='data:post.labels' var='label'> <a expr:href='data:label.url' rel='tag'><data:label.name/></a><b:if cond='data:label.isLast != "true"'>,</b:if> </b:loop> </b:if> </span> </p> <center><img src='http://bp2.blogger.com/_AVxLoZ0mR_0/R3-8aw3SxjI/AAAAAA AAAnM/Z3AlnL1FsMY/s400/bluedivider-b.gif'/></center> <p class='post-footer-line post-footer-line-3'/> </div> |
When you make the change or addition, use Preview to see if it's what you think it's going to be. Wait until you're satisfied to save it. You can always "clear edits" and back out if you're not confident.
Bla bla bla, says the post!
LAZY WAY TO ADD A LINE:
I used to include <hr color=crimson> in my post template code so that a crimson line would be drawn during creation of the blank post and I'd then write my post above the crimson line. This was easier than adding a line or image to the footer widget, so a beginner might be attracted to it just for the ease of it. Some day all beginners stop being nervous about getting into the template, but it doesn't have to be today! I remember the feeling.
NOTE: additional graphics at http://www.graphics-4free.com/
Friday, March 06, 2009
Speaking To A Newbie About Blogger Support
|
Thursday, February 12, 2009
How To Post Photos
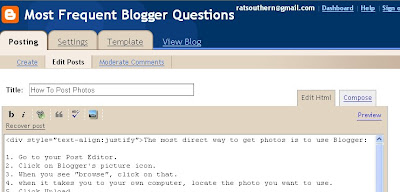
The most direct way to get photos on your post is to use Blogger's picture icon:
There are alternate free photo hosts such as Picasa, Photobucket, Flickr, etc. With some of them, costs may ensue if you exceed their limits. Try any of them, though, as alternatives when your photo host is troublesome. One may work when another one does not.
There are several useful screenshots below!
First is a screenshot of the top part of this post in the Post Editor. It shows the Blogger picture icon, the tiny rectangle that's blue in the top half, and primarily green in the bottom half.]
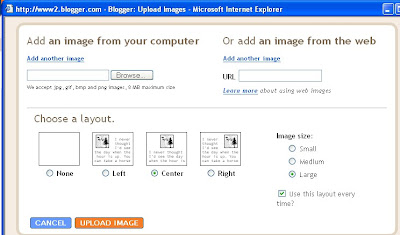
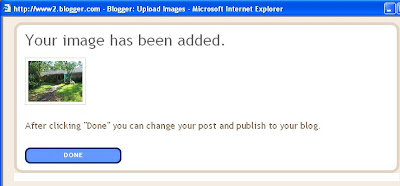
[Below are screen shots of the photo download process.]
New images always load into a post at the top. If you view the image in Compose mode, you can Drag and Drop it to other locations; if you are viewing it in Edit Html mode, use Cut and Paste to relocate it.
END.
| 1. Go to your Post Editor. 2. Click on Blogger's picture icon. 3. When you see "browse", click on that. 4. when it takes you to your own computer, locate the photo you want to use. 5. Click Upload. 6. Click on Done. 7. If you uploaded to a post different from where it's intended to go, possibly even on a different blog, Copy the html code. 8. Paste the code into the right post. |
There are alternate free photo hosts such as Picasa, Photobucket, Flickr, etc. With some of them, costs may ensue if you exceed their limits. Try any of them, though, as alternatives when your photo host is troublesome. One may work when another one does not.
There are several useful screenshots below!
[More below...Screenshots]
First is a screenshot of the top part of this post in the Post Editor. It shows the Blogger picture icon, the tiny rectangle that's blue in the top half, and primarily green in the bottom half.]

[Below are screen shots of the photo download process.]
New images always load into a post at the top. If you view the image in Compose mode, you can Drag and Drop it to other locations; if you are viewing it in Edit Html mode, use Cut and Paste to relocate it.
END.
Saturday, February 07, 2009
Move Items Above Or Below Post
|
[More below...screenshots of the "Configure Blog Posts" page.]
Click each screenshot for larger image!


Sunday, December 14, 2008
Move (Re-locate) Photos in a Post
| Most photos get loaded at the top of the post. I am not aware of any way to "point" with the cursor or otherwise assign the photo being uploaded a specific position in a post. The photo or image can, of course, be moved after it has been uploaded. Below are two methods for changing the photo position(s): In Compose mode you can see the photos. You can relocate the image by dragging and dropping it. In Edit Html mode you will see the code for the photos and will have to use Preview (or switch to the Compose mode) to see images. You can move it by using Cut and Paste on the code. If Compose tab is missing, you might have to go to Settings to activate it or it may be that you need to Refresh (F5) or clear your cache and cookies to make the link/icon visible again. |
Also of value, consider Table for Horizontal Photos In Post .
Sunday, July 20, 2008
Post Template
| Adding code or text to every post |
|---|
If adding a bit of code to every post is sufficient to do a certain job, why bother with Copy and Paste? Why not use the Post Template? You can use CSS for some things, but it's more difficult in some cases. If you're new to Blogger, it's easier to wrap your brain around the Post Template!
|
[More below...Examples]
Below are items of code or text you might want in every post and can put it in every new post with the Post Template. These are only examples, not meant as literal recommendations—after all, I don't know you well enough!
The Post Template will not help you with existing (old) posts, only with ones you create after the Template has been created. |
Thursday, July 03, 2008
Convert Html to a Displayable Post Text
| -- AMPERSAND CODES can be used in short sections to show the code itself (which is what I might do to show single nonbreaking space. HTML Ampersand Character Codes -- For longer sections that need to be "translated" or if you're lazy, the programs below convert html code for you. Both work well, though Postable's first screen is a little less intuitive. Postable Quick Escape The code above would be displayed first in the post as code, then on screen here like this (converted by Quick Escape): <a href=\"http://www.accessify.com/tools-and-wizards/developer-tools/quick-escape/\">Quick Escape</a> Normally that anchor code would be executed as a link, not shown on screen. |
END.
Friday, May 02, 2008
Future-Dating A Post -- NEW!
| Create the illusion of "being there".! |
|---|
| Future Dating of posts is now available from Blogger Click here to see Blogger's instructions about it! Now you can leave some posts lined up when you are about to leave on vacation or for a month in jail and they will publilsh, one or more every day, while you're absent. So many people have inquired about this for the past five years that I suppose a lot of people will now praise the lord and send their checks (as usual) to the nation's poor. I have heard a great many complaints about how it "doesn't work", yet I don't think I've had a single one fail to publish. Admittedly, I am using the "future-publishing" on a more infrequent basis than some people. I doubt I ever use it more than 2 or 3 times a week. [More below...] There doesn't appear to be any difficult moves added to the Publishing process. It works the way many of us used to think would just be logical. One could always use the Post Options to change the date to anything you liked, but there was no automatic publishing--you always had to come back and hit the publish "button" on that date. 1. Give a date and time in Post Options for tomorrow, next week, or whenever 2. Then hit Publish, 3. The system will show a sign that says the post will be automatically published on X date at X time. 4. the system will wait until that date and time to publish it. Couldn't be simpler, unless they screw it up. If they screw it up, let me know. |
Saturday, November 17, 2007
Table for Horizontal Photos In Post
| Ronald | Southern |
|---|---|
 | |
Haven't done any of those in a while. Tedious.
Below is the code that makes a small table like the one above have photos side by side:[Those of you wishing to cut to the chase quickly, start reading the large yellow-highlight area below, which is below the fourth straight red line.]
<center><table border=4 width=95%><tr><th align=center>Ronald</th> <th align=center>Southern</th></tr><tr><td><img src=\"https://blogger.googleusercontent.com/img/b/R29vZ2xl/AVvXsEhzaOEgOjpEK1oRv_I88gykcbl-wVKUiaG4nUQTbzGx7OYC3F7ugr-QGGpk7nkrUl9CmLjxGYJeuuwlbY_sHmShNTEHKfSvwho-qveJ9aXts9OR9qeLwErBJvBpwa4pmQ1LeSFP/s1600/twinkiebite.gif\" /> </td> <td><img src=\"https://blogger.googleusercontent.com/img/b/R29vZ2xl/AVvXsEhzaOEgOjpEK1oRv_I88gykcbl-wVKUiaG4nUQTbzGx7OYC3F7ugr-QGGpk7nkrUl9CmLjxGYJeuuwlbY_sHmShNTEHKfSvwho-qveJ9aXts9OR9qeLwErBJvBpwa4pmQ1LeSFP/s1600/twinkiebite.gif\" /> </td></tr></table> </center>
[More below...]
A MORE SIMPLISTIC SAMPLE OF A TABLE (followed by its code) is shown below:
| PICTURE | OR TEXT |
<table border=2>
<tr>
<td>PICTURE</td>
<td>OR TEXT</td>
</tr>
</table>
PREVENT LINE BREAKS:
In order for the Table not to cause extra line breaks in Blogger posts, there are two methods:
Method #1: You may need to copy it out like this (no line breaks of your own):
<table border=2><tr><td>PICTURE</td><td>OR TEXT</td></tr></table>
--To create additional row(s), add another set of "table records" such as
<tr><td>picture or text</td></tr>
as needed. Place them after the first table record and before the end tag, </table>.
--Remember that the photos cannot exceed the width of the area where you are placing them or else it will create problems, probably your sidebar being pushed down.
Method #2: This is something I've tried a number of times now. It does seem to be very effective, especially if you're going to use tables often. It is not good, though, for creating a table around a list (numbered or otherwise) because it will remove the page breaks and show the list as if it's a regular paragraph. It'll make the info resemble a traffic jam. This method makes the change in this way, using css:
Table Formatting In CSS
My explanation of the Table Formatting (Method #2) which I learned from the site above is as follows--changing the table in the CSS: |
Sunday, September 30, 2007
Create a URL For Your Profile Pic
How to get a URL for an "About Me" photo that is only on your computer at present
END.
| Another Didactic List |
|---|
| 1. If you need to alter the photo size, use a photo program to do so while it's still on your computer. 2. Use a blog post (on your main blog or some other) and use the photo icon (in the toolbar above the Edit Post text box) to add a photo. 3. You'll Browse your own computer, select one, and upload it to that post. 4. When you've completed that, you'll have a lot of code for a large and small photo pair, part of which ("http://... etc.) is the URL. 5. Save that post, but it's not necessary to publish it. 6. Use the right-click menu on the mouse to Copy the URL. 7. You can later Paste it into the "Photo URL" box in your blog's Edit Profile list. 8. Be sure to save the change at the bottom of the Edit Profile page. |
If you use Blogger's picture icon or otherwise end up with the code for both large and small images, go here to unscramble the text and select the code for the smaller one at Header Picture Code.
END.
Wednesday, September 19, 2007
Manage Posts -- Screenshot
AKA "EDIT POSTS", depending on which menu you follow to get to this screen.

| DELETE or PUBLISH multiple posts! |
|---|
| Not shown, but at the bottom of the above page, there's buttons to click for "Publish Selected" or "Delete Selected". If you click on each of the boxes in front of the posts you'd like to delete or publish all at once, then you can click those Selection buttons. This is the only place you can delete multiple posts at once! |
Saturday, September 08, 2007
Trouble Posting Photos
A lot of people have that trouble at times, but also a lot do not. Hard to know any simple solution. If possible, change (even if temporarily) to another browser. Sometimes IE6 or IE7 will do a better job, sometimes Firefox or others will work better. If it gets the job done, you can then switch back to whatever you're used to. Or, there's no reason why you can't have one browser open in one window while you open another window for a second browser--you can alternate between them.
If you've been trying to add an image to text, make a new post and see what happens when you do it the other way around: add the text last. Or (again) do it the other way around! Don't treat it like a household problem, treat it like War! Try everything! All is fair! Click the Home and End buttons on your keyboard. You might even keep a Fake Blog around and try sending the photos to a post there.If that works, copy the html code and then paste it in where you want it.
END.
| There are alternate free photo hosts such as Picasa, Photobucket, Flickr, etc. With some of them, costs may ensue if you exceed their limits. Try any of them, though, as alternatives when your photo host is troublesome. One may work when another one does not. Try it! |
If you've been trying to add an image to text, make a new post and see what happens when you do it the other way around: add the text last. Or (again) do it the other way around! Don't treat it like a household problem, treat it like War! Try everything! All is fair! Click the Home and End buttons on your keyboard. You might even keep a Fake Blog around and try sending the photos to a post there.If that works, copy the html code and then paste it in where you want it.
Also see my Emergency Steps at the top of this blog for some general info about things not working.
END.
Tuesday, July 24, 2007
Activate Post Pages
| From your Dashboard, |
|---|
| 1. Go to Settings, 2. then Archive, 3. then select "Yes" at Enable Post Pages. 4. Click Save Settings. |
Sunday, July 08, 2007
Header Picture Code
Unscrambling Blogger photo code for Header picture code
Blogger's picture icon is good for regular pictures in the post or in the sidebar, but it's overdone for the purpose of putting a photo in your header. You don't need both large and small versions for the header.
What Blogger may give you when you upload the photo to a post (Save it, but don't Publish it!) will resemble this:
<a href="https://blogger.googleusercontent.com/img/b/R29vZ2xl/AVvXsEiW0WfYsy_i4SwyaYumkQqxeLUFNu54pRYjaZfSPrMVvC1TPTUd7jd65bUanoyRQUUy5h3wInYtFVCoSkf5Co99QUH5n6v9_ZBhOF9fr-fIX6vW0oLQm-kfyfZnyJBk1p1KXlBU/s1600-h/dgblues.jpg"><img id="BLOGGER_PHOTO_ID_5025971925707284738" style="DISPLAY: block; MARGIN: 0px auto 10px; CURSOR: hand; TEXT-ALIGN: center" alt="" src="https://blogger.googleusercontent.com/img/b/R29vZ2xl/AVvXsEiW0WfYsy_i4SwyaYumkQqxeLUFNu54pRYjaZfSPrMVvC1TPTUd7jd65bUanoyRQUUy5h3wInYtFVCoSkf5Co99QUH5n6v9_ZBhOF9fr-fIX6vW0oLQm-kfyfZnyJBk1p1KXlBU/s400/dgblues.jpg" border="0" /></a>
What you would need to extract is this:
https://blogger.googleusercontent.com/img/b/R29vZ2xl/AVvXsEiW0WfYsy_i4SwyaYumkQqxeLUFNu54pRYjaZfSPrMVvC1TPTUd7jd65bUanoyRQUUy5h3wInYtFVCoSkf5Co99QUH5n6v9_ZBhOF9fr-fIX6vW0oLQm-kfyfZnyJBk1p1KXlBU/s1600/dgblues.jpg
If you didn't notice on your own, the difference between the red code at the top and the red code above this paragraph is that the -h has been deleted after S1600.
SMALL IMAGE: The url contained in the blue text (marked S400) is the smaller of the images and will need no correction--just the code, such as this, shown above:
https://blogger.googleusercontent.com/img/b/R29vZ2xl/AVvXsEiW0WfYsy_i4SwyaYumkQqxeLUFNu54pRYjaZfSPrMVvC1TPTUd7jd65bUanoyRQUUy5h3wInYtFVCoSkf5Co99QUH5n6v9_ZBhOF9fr-fIX6vW0oLQm-kfyfZnyJBk1p1KXlBU/s400/dgblues.jpg
END.
Blogger's picture icon is good for regular pictures in the post or in the sidebar, but it's overdone for the purpose of putting a photo in your header. You don't need both large and small versions for the header.
What Blogger may give you when you upload the photo to a post (Save it, but don't Publish it!) will resemble this:
<a href="https://blogger.googleusercontent.com/img/b/R29vZ2xl/AVvXsEiW0WfYsy_i4SwyaYumkQqxeLUFNu54pRYjaZfSPrMVvC1TPTUd7jd65bUanoyRQUUy5h3wInYtFVCoSkf5Co99QUH5n6v9_ZBhOF9fr-fIX6vW0oLQm-kfyfZnyJBk1p1KXlBU/s1600-h/dgblues.jpg"><img id="BLOGGER_PHOTO_ID_5025971925707284738" style="DISPLAY: block; MARGIN: 0px auto 10px; CURSOR: hand; TEXT-ALIGN: center" alt="" src="https://blogger.googleusercontent.com/img/b/R29vZ2xl/AVvXsEiW0WfYsy_i4SwyaYumkQqxeLUFNu54pRYjaZfSPrMVvC1TPTUd7jd65bUanoyRQUUy5h3wInYtFVCoSkf5Co99QUH5n6v9_ZBhOF9fr-fIX6vW0oLQm-kfyfZnyJBk1p1KXlBU/s400/dgblues.jpg" border="0" /></a>
What you would need to extract is this:
https://blogger.googleusercontent.com/img/b/R29vZ2xl/AVvXsEiW0WfYsy_i4SwyaYumkQqxeLUFNu54pRYjaZfSPrMVvC1TPTUd7jd65bUanoyRQUUy5h3wInYtFVCoSkf5Co99QUH5n6v9_ZBhOF9fr-fIX6vW0oLQm-kfyfZnyJBk1p1KXlBU/s1600/dgblues.jpg
If you didn't notice on your own, the difference between the red code at the top and the red code above this paragraph is that the -h has been deleted after S1600.
SMALL IMAGE: The url contained in the blue text (marked S400) is the smaller of the images and will need no correction--just the code, such as this, shown above:
https://blogger.googleusercontent.com/img/b/R29vZ2xl/AVvXsEiW0WfYsy_i4SwyaYumkQqxeLUFNu54pRYjaZfSPrMVvC1TPTUd7jd65bUanoyRQUUy5h3wInYtFVCoSkf5Co99QUH5n6v9_ZBhOF9fr-fIX6vW0oLQm-kfyfZnyJBk1p1KXlBU/s400/dgblues.jpg
Assuming that the S400 is actually small and not just less than the large one, you could enter that code, as shown, into the Photo Url as your Profile Photo.
END.
Friday, June 22, 2007
Delete A Post Or Draft
| To delete either a Published or a Draft Post |
|---|
| 1. From the Dashboard, Click on Manage: Posts for the appropriate blog. 2. Click the box to the left of the appropriate post. That will highlight the whole line with yellow. 3. Keeping track of the yellow highlight, move to the far right so that you can click Delete there. You will be asked if you are sure you want to delete it. Click on the "Delete It" to confirm it. |
Below is the screenshot to illustrate the above. The sixth line, "Am I Beta Yet", is highlighted with pale yellow because the "delete" box has been checked for it:

Note: when "delete" doesn't work as it should, one temporary fix would be to try the "save as draft" option which has the effect of "un-publishing" the post. It will still be on your Edit Posts list, but your visitors won't see it any more.
END.
Saturday, May 05, 2007
Sidebar Labels List In Classic Blogger
In order to put a labels list in by hand in the sidebar of Classic templates:
Click on a label below your post and copy its URL from the address bar once the Permalink has opened. Then you can paste this code into the template sidebar :
name of label
< href="url of label Permalink">name of label</a>
When clicked on by visitors, they'll be provided all relevant posts to scroll through, one after another--but not a concise list of titles.
Saturday, March 24, 2007
Background Color Of A Post
Classic Blogger:
#birdlist {margin:0px;padding:0px;background:navy;color:lightblue;font: 1.1em "Times New Roman","Trebuchet MS",Trebuchet,Verdana,Sans-Serif; font-weight:none; }
</style>
After that is established in the template, any time that in your post you place <p id=birdlist> at the beginning and </p> at the end of that text, you will create the font color and background color that you want. You might change navy to white and lightblue to black, depending on what you want. If you don't invoke the paragraph id in your post, it will just write in black over your current background (if any).
Don't be tripped up by the list of fonts; the computers in the world will choose the first one they come to that they possess. So if you choose a really new and esoteric font, you may be the only reader who sees it in just that font. But they will see it in the second, third, or fourth font listed.
THE END.
In your template, just before the closing tag </style> occurs, place the couple of lines below (which you can change to your colors or fonts). This will just be an example you can start with as a test. This paragraph demonstrates what the code below causes.
#birdlist {margin:0px;padding:0px;background:navy;color:lightblue;font: 1.1em "Times New Roman","Trebuchet MS",Trebuchet,Verdana,Sans-Serif; font-weight:none; }
</style>
After that is established in the template, any time that in your post you place <p id=birdlist> at the beginning and </p> at the end of that text, you will create the font color and background color that you want. You might change navy to white and lightblue to black, depending on what you want. If you don't invoke the paragraph id in your post, it will just write in black over your current background (if any).
Don't be tripped up by the list of fonts; the computers in the world will choose the first one they come to that they possess. So if you choose a really new and esoteric font, you may be the only reader who sees it in just that font. But they will see it in the second, third, or fourth font listed.
| New Blogger |
|---|
| The main difference here is that you don't make the addition in the same place. When you open the template, you need to search for the Style items that you know, though they are not called that! Search for "Body" and other style (CSS) listings that you might already be familiar with. You might see something like this: body { background:oldlace; url("http://www.blogblog.com/harbor/rocks.jpg") no-repeat right bottom; background-attachment:fixed; margin:0; padding:0; font:x-small Georgia, Serif; color:$textcolor; font-size/* */:/**/small; font-size: /**/small; } Put the additional (birdlist) lines after the above, but BEFORE the closing } bracket. There are other places that would be correct, and I'm just pointing out one. This #ID is not limited to paragraphs; it could also be applied to a <div>, etc. |
THE END.
Saturday, February 24, 2007
Change Font In Posts
| In New Blogger: |
|---|
| 1. go to Dashboard 2. go to Layout 3. click on Fonts and colors 4. click Text Font in box at left 5. locate list of font styles at right 6. click one. 7. click Save Changes when finished END. |
Wednesday, January 24, 2007
Timestamp Format
How to display your time format under the post:
1. Click Settings.
2. Click Formatting.
3. Click Timestamp Format. Select a time display.
4. Save Settings at bottom of page.
END.
1. Click Settings.
2. Click Formatting.
3. Click Timestamp Format. Select a time display.
4. Save Settings at bottom of page.
END.
Subscribe to:
Comments (Atom)


