
| Maybe it's not activated. |
|---|
|
Thursday, December 13, 2007
People Can't See My Profile?

Saturday, December 08, 2007
Remove Blogger Help Group Message
To delete a word (or the whole message) you left in Blogger Help Group (BHG)
[You can do it, but there's no direct way to do so.]
| Revise your message |
|---|
| 1. Copy your message and revise it. 2. Copy the new text and/or code. 3. Paste the revised info into a new message. 4. If it works out right, delete (Remove) the original message. |
| Remove Message In Blogger Help Group: |
|---|
| 1. Click on "more options" in the upper right corner of your own message. 2. Click on "Remove" in the list of options in blue text. 3. Click on "Yes, remove it now". 4. Click the "Confirm" button. |
If it feels like you're telling it to do the above 3 times at least, welcome to the club!
Thursday, December 06, 2007
Dashboard Example
These are some old instructions and I'll update it when I feel like it. The screen has changed. Sorry.

Above screenshot shows several blogs on the left, the Edit Profile section on the right, and the Language drop-down menu below that.
Edit Profile, to state the obvious, is where you go to paste the url for your Profile Photo.
Thursday, November 29, 2007
Revert To Never-Never-Land?
| I found a curious thing, though I may be among the last to discover it. I just took a recently-created blog, played with it, then subjected it to the "Revert to Classic" button. Oddly enough, the system "reverted" it even though it had never been a classic template. I didn't test everything about it, but I thought it was very curious. Maybe someday I'll think of some use for this marvellous piece of information. Till then, la di dah... |
Wednesday, November 21, 2007
Change Email Options In Google Subscription List
| 1. Go to your subscription page where all the posts are listed. 2. Find the "Edit my membership" icon on the right and click it. 3. Then you'd have a page listing the options about email choices. 4. Select one option. 5. Be sure to click "Save these settings". |
Saturday, November 17, 2007
Table for Horizontal Photos In Post
| Ronald | Southern |
|---|---|
 | |
Haven't done any of those in a while. Tedious.
Below is the code that makes a small table like the one above have photos side by side:[Those of you wishing to cut to the chase quickly, start reading the large yellow-highlight area below, which is below the fourth straight red line.]
<center><table border=4 width=95%><tr><th align=center>Ronald</th> <th align=center>Southern</th></tr><tr><td><img src=\"https://blogger.googleusercontent.com/img/b/R29vZ2xl/AVvXsEhzaOEgOjpEK1oRv_I88gykcbl-wVKUiaG4nUQTbzGx7OYC3F7ugr-QGGpk7nkrUl9CmLjxGYJeuuwlbY_sHmShNTEHKfSvwho-qveJ9aXts9OR9qeLwErBJvBpwa4pmQ1LeSFP/s1600/twinkiebite.gif\" /> </td> <td><img src=\"https://blogger.googleusercontent.com/img/b/R29vZ2xl/AVvXsEhzaOEgOjpEK1oRv_I88gykcbl-wVKUiaG4nUQTbzGx7OYC3F7ugr-QGGpk7nkrUl9CmLjxGYJeuuwlbY_sHmShNTEHKfSvwho-qveJ9aXts9OR9qeLwErBJvBpwa4pmQ1LeSFP/s1600/twinkiebite.gif\" /> </td></tr></table> </center>
[More below...]
A MORE SIMPLISTIC SAMPLE OF A TABLE (followed by its code) is shown below:
| PICTURE | OR TEXT |
<table border=2>
<tr>
<td>PICTURE</td>
<td>OR TEXT</td>
</tr>
</table>
PREVENT LINE BREAKS:
In order for the Table not to cause extra line breaks in Blogger posts, there are two methods:
Method #1: You may need to copy it out like this (no line breaks of your own):
<table border=2><tr><td>PICTURE</td><td>OR TEXT</td></tr></table>
--To create additional row(s), add another set of "table records" such as
<tr><td>picture or text</td></tr>
as needed. Place them after the first table record and before the end tag, </table>.
--Remember that the photos cannot exceed the width of the area where you are placing them or else it will create problems, probably your sidebar being pushed down.
Method #2: This is something I've tried a number of times now. It does seem to be very effective, especially if you're going to use tables often. It is not good, though, for creating a table around a list (numbered or otherwise) because it will remove the page breaks and show the list as if it's a regular paragraph. It'll make the info resemble a traffic jam. This method makes the change in this way, using css:
Table Formatting In CSS
My explanation of the Table Formatting (Method #2) which I learned from the site above is as follows--changing the table in the CSS: |
Wednesday, November 07, 2007
How To Hide Comments
| Turn Off Comments |
|---|
|
END.
Sunday, November 04, 2007
Where Is "Style" In New Blogger?
|
END.
Thursday, November 01, 2007
Adding Pages
| Adding Pages, MS Word Documents, Spreadsheets Some people want to add pages other than just another post, maybe something with a document or spreadsheet look. They should check out: |
| Google Docs and Spreadsheets |
| Google Sites |
| I only used Google Docs for implementing MS Word documents, so I have limited experience. Google Docs worked very well for me, much better than merely trying to put a Word document into the Blogger Editor—and, of course, you can't "attach" a document as you can in emails! If you can create or paste your file in Google Docs, you can of course create a link to it from your blog or elsewhere. Other programs said to be useful in this situation are: |
Monday, October 29, 2007
Having Your Titles Show In Archive
If you want your Archive to show your own post titles (as opposed to all dates), set your "Configure Blog Archive" page element like this screenshot. Make sure that "Hierarchy" and "Show Post Titles" are both marked.
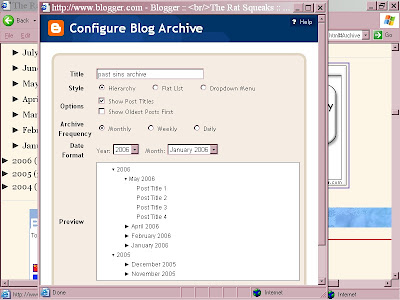
[click image to enlarge]
If your Archive list is not seen in the sidebar, check the page elements in the Layout page and see if it has been deactivated. If not turned on, you should add it. Look carefully at its settings, then save them.
END.

If your Archive list is not seen in the sidebar, check the page elements in the Layout page and see if it has been deactivated. If not turned on, you should add it. Look carefully at its settings, then save them.
END.
Friday, October 19, 2007
Find Width of Header For New Image
| Header Width |
|---|
| This will tell you places to look for the width of your header. The image you want to place there should not exceed that. You should use a photo program to alter the width of your image BEFORE you upload it to your photo host (whether Blogger or otherwise). To find the width of the header 1. Click Template 2. Click Edit Html 3. Scroll down to the header,header-wrapper, or wrap code and look for the WIDTH parameter. 4. If not found, look for outer-wrapper and see it's width. It will look something like this : #outer-wrapper { width: 1000px; } |
Or you could adjust the same WIDTH in the template CSS
If you are unwilling to fuss with making your photo width match the width of the header, you could try this. You might find some code like the one above or this one below showing the #wrap; change the width of 100px to 900, 850, or so until it begins to look acceptable to you. Don't Save until then. If your photo just wasn't nearly wide enough, it may still look odd (short) to some eyes. Actually adjusting the width of your image in a photo program would then be the better choice.
| Another possible location of header width: #wrap { margin: 10px auto 0px; padding: 0px 5px; width: 900px; text-align:left; } |
END.
Thursday, October 18, 2007
Preformatted Text--Show Spaces and Html
ee cummings's defunct |
Dear mr cummings: I know you're dead, but you might try putting the text of your poems between these tags:
<pre> text </pre>
This means that it will accept the preformatted text exactly as presented, though usually not in fancy fonts. The pre tags are also useful for computer codes if you don't wish to use the html ampersand codes or otherwise translate the special coding signs.
[More below...]
The PRE element contains preformatted text. Visual browsers should render preformatted text in a fixed-width font, should not collapse whitespace, and should not wrap long lines.
PRE is useful for formatting computer code or poetry where whitespace is important, but since preformatted text is inherently visual, authors should avoid dependence on it wherever possible. When using PRE, authors should avoid altering the element's fixed-width font or non-collapsing whitespace properties by means of style sheets.
| related matters: |
|---|
| -- NON-BREAKING SPACES can be used as extended space or as a tab. A non-breaking space looks like this: Three of them would be simply: An ee cummings poem, though, might drive you crazy, so be cautious! SHOWING HTML CODE: -- AMPERSAND CODES can be used in short sections to show the code itself (which is what I did to show the non-breaking space code above). HTML Ampersand Character Codes -- For longer sections that need to be "translated" or if you're lazy, the programs below convert html code for you. Both work well, though Postable's first screen is a little less intuitive. For Postable's mysterious first screen, just left-click the mouse on the phrase in the upper left corner, "for your copy and pasting pleasure" and, when the screen clears, you can enter the code you want it to fully display. Next you click on "Make it friendly" in the lower right corner and it will do so. Right-click the mouse and Copy the highlighted text, then paste it where you intend it to show. Postable Quick Escape |
END.
Thursday, October 11, 2007
Centering Header Image
| A. First try making the image the right size |
|---|
| To center image in the header, use a photo program to resize the width of the image to fit the size of the header. To find the width of the header 1. Click Template 2. Click Edit Html 3. Scroll down to the header,header-wrapper, or wrap code and look for the WIDTH parameter. 4. If not found, look for outer-wrapper and see it's width. It will look something like this : #outer-wrapper { width: 1000px; } |
[More below...]
| B. Or you could adjust the same WIDTH in the template CSS |
|---|
| If you are unwilling to fuss with making your photo width match the width of the header, you could try this. You might find some code like the one above or this one below; change the width of 100px to 900, 850, or so until it begins to look acceptable to you. Don't Save until then. If your photo just wasn't nearly wide enough, it may still look odd (short) to some eyes. Selection A would then be the better choice. #wrap { margin: 10px auto 0px; padding: 0px 5px; width: 1000px; text-align:left; } |
Hopefully you made a safety copy of your template before you started monkeying with the code or making any changes--you know, in case all hell breaks loose and you need to rescue yourself!
Saturday, October 06, 2007
View Anyone's Source Code
| Internet Explorer |
|---|
| To view the code that other people use to display an icon, image, button, or other item, look at the browser (not Blogger) toolbar up above (while you are at their site) and 1. click View 2. click Source 3. right-click your mouse 4. click Select All 5. right-click again and click Copy. 6. open a Notepad file and Paste the code there. 7. Locate the applicable code, where it starts and ends. 8. Copy and Paste that snippet of code into your own template or page elements. |
| FIREFOX |
|---|
| For those of you who use or are comfortable with Firefox, it's simpler: 1. Mark (highlight) the area of interest. 2. Then right-click the mouse. 3. Click on "View Selection Source". 4. Code will appear on screen; Copy & Paste what's needed. |
END.
Friday, October 05, 2007
Use CSS To Align Header Text
Text-align: center/left/right
END.
| Header Alignment |
|---|
| Setting alignment for the header has to be done in the template. The first section below of CSS instructions (from my blog, "The Rat Squeaks") does various things including that it sets the blog title to be centered. .Header h1 { margin:0 0 .25em; color:$titlecolor; font: $pagetitlefont; font-variant: small-caps ; text-align: center; } |
[More below...Description alignment]
| Description Alignment |
|---|
| Not far behind it comes this section for parameters of the Description, also setting the alignment to Center: .Header .description { margin:0; max-width:700px; line-height:1.8em; text-transform:none; text-align:center; letter-spacing:.2em; color:$titlecolor; font: $blogDescriptionFont; } |
Your template may vary, so I can only give this example of where and how to find/place these CSS instructions. Use the exact formula if you are placing a new instruction there. Examples given below:
| text-align:center; text-align:left; text-align:right; |
END.
Sunday, September 30, 2007
Create a URL For Your Profile Pic
How to get a URL for an "About Me" photo that is only on your computer at present
END.
| Another Didactic List |
|---|
| 1. If you need to alter the photo size, use a photo program to do so while it's still on your computer. 2. Use a blog post (on your main blog or some other) and use the photo icon (in the toolbar above the Edit Post text box) to add a photo. 3. You'll Browse your own computer, select one, and upload it to that post. 4. When you've completed that, you'll have a lot of code for a large and small photo pair, part of which ("http://... etc.) is the URL. 5. Save that post, but it's not necessary to publish it. 6. Use the right-click menu on the mouse to Copy the URL. 7. You can later Paste it into the "Photo URL" box in your blog's Edit Profile list. 8. Be sure to save the change at the bottom of the Edit Profile page. |
If you use Blogger's picture icon or otherwise end up with the code for both large and small images, go here to unscramble the text and select the code for the smaller one at Header Picture Code.
END.
Monday, September 24, 2007
How To Stop BHG Emails
Many of us cease to need these emails as suddenly as we began to need them!
END.
| Turn Off Blogger-Help-Group Email Messages |
|---|
| 1. Go to "Edit my membership" 2. Set the options on the left to "no email" or click "Unsubscribe". 3. Click on "Save these Settings". |
END.
Wednesday, September 19, 2007
Manage Posts -- Screenshot
AKA "EDIT POSTS", depending on which menu you follow to get to this screen.

| DELETE or PUBLISH multiple posts! |
|---|
| Not shown, but at the bottom of the above page, there's buttons to click for "Publish Selected" or "Delete Selected". If you click on each of the boxes in front of the posts you'd like to delete or publish all at once, then you can click those Selection buttons. This is the only place you can delete multiple posts at once! |
Saturday, September 08, 2007
Trouble Posting Photos
A lot of people have that trouble at times, but also a lot do not. Hard to know any simple solution. If possible, change (even if temporarily) to another browser. Sometimes IE6 or IE7 will do a better job, sometimes Firefox or others will work better. If it gets the job done, you can then switch back to whatever you're used to. Or, there's no reason why you can't have one browser open in one window while you open another window for a second browser--you can alternate between them.
If you've been trying to add an image to text, make a new post and see what happens when you do it the other way around: add the text last. Or (again) do it the other way around! Don't treat it like a household problem, treat it like War! Try everything! All is fair! Click the Home and End buttons on your keyboard. You might even keep a Fake Blog around and try sending the photos to a post there.If that works, copy the html code and then paste it in where you want it.
END.
| There are alternate free photo hosts such as Picasa, Photobucket, Flickr, etc. With some of them, costs may ensue if you exceed their limits. Try any of them, though, as alternatives when your photo host is troublesome. One may work when another one does not. Try it! |
If you've been trying to add an image to text, make a new post and see what happens when you do it the other way around: add the text last. Or (again) do it the other way around! Don't treat it like a household problem, treat it like War! Try everything! All is fair! Click the Home and End buttons on your keyboard. You might even keep a Fake Blog around and try sending the photos to a post there.If that works, copy the html code and then paste it in where you want it.
Also see my Emergency Steps at the top of this blog for some general info about things not working.
END.
Sunday, September 02, 2007
Enable Comment Moderation
If you think this is too much trouble, then you are evidently not very interested in your comments or in your own well-being. This will help!
END.
| Close the door to spammers, stalkers, skunks, and skulkers! |
|---|
| 1. Go into your Dashboard. 2. Click on Manage Settings. 3. Click on Comments. 4. You have a long list of options here. 5. Answer Yes to "Enable comment moderation?" 6. Be sure to go to bottom of page and Save Settings |
END.
Saturday, September 01, 2007
Subscription List--Google Groups
| How Others Subscribe To Your Blog |
|---|
Create the group for your blog. |
Everyone who subscribes will be sent an email copy of each new post, but there are options so you (or other individual subscribers) may select various forms of abridgement instead of the full post. How do you want to read this group?See Change Email Options In Subscription List Of course, Blogger already has a "Subscribe to Posts" link at the bottom of the blog. Many people use that. |
Saturday, August 04, 2007
Unordered List In Sidebar
You have two options: OR
Before I forget, there is a third kind of list; when you just start your list items and don't specify either ordered or unordered, you will get plain bullets (or whatever your CSS specifies)
If you are using a Classic template, you will need a list of this sort for the sidebar. In a Layout template, you'd put the code in a Gadget.
Put this after or at least not inside the other ul lists in the sidebar in the template.
If your template uses a particular "class" for it's titles in the sidebar, just imitate (copy) them in order for your new list titles to match the old ones.
For a second list, if needed, do another title and pair of start and end tags and fill in the middle part.
- Unordered List (with bullets)
- Unordered List (with bullets)
- Ordered list (numbered)
- Ordered list (numbered)
Before I forget, there is a third kind of list; when you just start your list items and don't specify either ordered or unordered, you will get plain bullets (or whatever your CSS specifies)
There is an even newer Blog List type of page element if you're trying to create a BlogRoll and you may find it preferable--it does a very different (and nifty) thing for you!
[More below...]
| (Page Element and Gadget (or Widget) are different names for the same thing--one is more accessible to you (through the Layout page) and the other, in the template, you can go into more deeply as far as editing it IF you know how!) So I prefer the ul or ol list, whose html code I can keep backed up in a Notepad file or other plain-text program, in an html/javascript page element. |
If you are using a Classic template, you will need a list of this sort for the sidebar. In a Layout template, you'd put the code in a Gadget.
Put this after or at least not inside the other ul lists in the sidebar in the template.
| Below is the code for a list of links that you could use HTML to put it in your sidebar via the Classic template or into a Gadget (html/javascript Page Element)in a Layout template. First one below is an example of a link. <h2>New Category</h2> <ul> <li><a href="http://www.zandria.us/">Keep Up With Me </a> </li> <li>list another one! </li> <li>list another one! </li> </ul> |
If your template uses a particular "class" for it's titles in the sidebar, just imitate (copy) them in order for your new list titles to match the old ones.
For a second list, if needed, do another title and pair of start and end tags and fill in the middle part.
| For just one link in the sidebar, use code as below: <a href="http://rodentia.blogspot.com/The Rat Squeaks</a> |
The difference between an unordered list as above and an ordered list which Numbers your list is merely using an ol tag instead of the ul tag!
Thursday, August 02, 2007
Leave Your Email At Blogger Help Group?
Your email address won't be published in BHG messages; Blogger will suppress it if you list it the normal way. You should use some spacing or else use tricks like:
ratsouthern AT gmail DOT com
And most experienced Internet users will know what you mean! Blogger won't suppress what it doesn't recognize nor will the spammer be likely to harvest it (which is what Blogger is trying to prevent when it suppresses our emails).
END.
ratsouthern AT gmail DOT com
And most experienced Internet users will know what you mean! Blogger won't suppress what it doesn't recognize nor will the spammer be likely to harvest it (which is what Blogger is trying to prevent when it suppresses our emails).
END.
Saturday, July 28, 2007
Gold Stars (In Blogger Help Group)
In Blogger Help Group, many new readers leave a question and then don't know how to retrace their steps to find out if an answer has ever been posted. If any of them are lucky enough to read this, the solution is easy.
Don't waste time leaving your email in the ordinary format, it won't work and therefore no one can email you!
See Leave Your Email At Blogger Help Group?
The above will save most new users a great deal of time. I wish I hadn't spent weeks before I discovered it all!
Also in Blogger Help Group, you can click Edit Membership and have email updates sent to you.
|
Don't waste time leaving your email in the ordinary format, it won't work and therefore no one can email you!
See Leave Your Email At Blogger Help Group?
The above will save most new users a great deal of time. I wish I hadn't spent weeks before I discovered it all!
Also in Blogger Help Group, you can click Edit Membership and have email updates sent to you.
Tuesday, July 24, 2007
Activate Post Pages
| From your Dashboard, |
|---|
| 1. Go to Settings, 2. then Archive, 3. then select "Yes" at Enable Post Pages. 4. Click Save Settings. |
Sunday, July 22, 2007
Show No "About Me"
Show no "About Me",
Show only the "View My Complete Profile".
This should allow most of the About Me to remain unseen, while your readers still have the View My Complete Profile to click on.
See also: Make Your Own Blogger Profile
Show only the "View My Complete Profile".
| 1. Go to the Layout section. 2. Click on Add Page Element. 3. Add it, if absent, or click on Edit Profile. 4. Click on Share my profile. 5. Do not click on About Me. 6. You may want to unclick the Show Location. If unsure, worry about it later. |
This should allow most of the About Me to remain unseen, while your readers still have the View My Complete Profile to click on.
See also: Make Your Own Blogger Profile
Transfer Blog From One Account To Another
In 4 easy steps:
Nitecruzr's Post
http://bloggerstatusforreal.blogspot.com/2007/06/how-to-transfer-blog-from-one-account.html
OR USE
Blogger's Instructions
or More Blogger's Instructions.
Nitecruzr's Post
http://bloggerstatusforreal.blogspot.com/2007/06/how-to-transfer-blog-from-one-account.html
OR USE
Blogger's Instructions
or More Blogger's Instructions.
Sunday, July 08, 2007
Header Picture Code
Unscrambling Blogger photo code for Header picture code
Blogger's picture icon is good for regular pictures in the post or in the sidebar, but it's overdone for the purpose of putting a photo in your header. You don't need both large and small versions for the header.
What Blogger may give you when you upload the photo to a post (Save it, but don't Publish it!) will resemble this:
<a href="https://blogger.googleusercontent.com/img/b/R29vZ2xl/AVvXsEiW0WfYsy_i4SwyaYumkQqxeLUFNu54pRYjaZfSPrMVvC1TPTUd7jd65bUanoyRQUUy5h3wInYtFVCoSkf5Co99QUH5n6v9_ZBhOF9fr-fIX6vW0oLQm-kfyfZnyJBk1p1KXlBU/s1600-h/dgblues.jpg"><img id="BLOGGER_PHOTO_ID_5025971925707284738" style="DISPLAY: block; MARGIN: 0px auto 10px; CURSOR: hand; TEXT-ALIGN: center" alt="" src="https://blogger.googleusercontent.com/img/b/R29vZ2xl/AVvXsEiW0WfYsy_i4SwyaYumkQqxeLUFNu54pRYjaZfSPrMVvC1TPTUd7jd65bUanoyRQUUy5h3wInYtFVCoSkf5Co99QUH5n6v9_ZBhOF9fr-fIX6vW0oLQm-kfyfZnyJBk1p1KXlBU/s400/dgblues.jpg" border="0" /></a>
What you would need to extract is this:
https://blogger.googleusercontent.com/img/b/R29vZ2xl/AVvXsEiW0WfYsy_i4SwyaYumkQqxeLUFNu54pRYjaZfSPrMVvC1TPTUd7jd65bUanoyRQUUy5h3wInYtFVCoSkf5Co99QUH5n6v9_ZBhOF9fr-fIX6vW0oLQm-kfyfZnyJBk1p1KXlBU/s1600/dgblues.jpg
If you didn't notice on your own, the difference between the red code at the top and the red code above this paragraph is that the -h has been deleted after S1600.
SMALL IMAGE: The url contained in the blue text (marked S400) is the smaller of the images and will need no correction--just the code, such as this, shown above:
https://blogger.googleusercontent.com/img/b/R29vZ2xl/AVvXsEiW0WfYsy_i4SwyaYumkQqxeLUFNu54pRYjaZfSPrMVvC1TPTUd7jd65bUanoyRQUUy5h3wInYtFVCoSkf5Co99QUH5n6v9_ZBhOF9fr-fIX6vW0oLQm-kfyfZnyJBk1p1KXlBU/s400/dgblues.jpg
END.
Blogger's picture icon is good for regular pictures in the post or in the sidebar, but it's overdone for the purpose of putting a photo in your header. You don't need both large and small versions for the header.
What Blogger may give you when you upload the photo to a post (Save it, but don't Publish it!) will resemble this:
<a href="https://blogger.googleusercontent.com/img/b/R29vZ2xl/AVvXsEiW0WfYsy_i4SwyaYumkQqxeLUFNu54pRYjaZfSPrMVvC1TPTUd7jd65bUanoyRQUUy5h3wInYtFVCoSkf5Co99QUH5n6v9_ZBhOF9fr-fIX6vW0oLQm-kfyfZnyJBk1p1KXlBU/s1600-h/dgblues.jpg"><img id="BLOGGER_PHOTO_ID_5025971925707284738" style="DISPLAY: block; MARGIN: 0px auto 10px; CURSOR: hand; TEXT-ALIGN: center" alt="" src="https://blogger.googleusercontent.com/img/b/R29vZ2xl/AVvXsEiW0WfYsy_i4SwyaYumkQqxeLUFNu54pRYjaZfSPrMVvC1TPTUd7jd65bUanoyRQUUy5h3wInYtFVCoSkf5Co99QUH5n6v9_ZBhOF9fr-fIX6vW0oLQm-kfyfZnyJBk1p1KXlBU/s400/dgblues.jpg" border="0" /></a>
What you would need to extract is this:
https://blogger.googleusercontent.com/img/b/R29vZ2xl/AVvXsEiW0WfYsy_i4SwyaYumkQqxeLUFNu54pRYjaZfSPrMVvC1TPTUd7jd65bUanoyRQUUy5h3wInYtFVCoSkf5Co99QUH5n6v9_ZBhOF9fr-fIX6vW0oLQm-kfyfZnyJBk1p1KXlBU/s1600/dgblues.jpg
If you didn't notice on your own, the difference between the red code at the top and the red code above this paragraph is that the -h has been deleted after S1600.
SMALL IMAGE: The url contained in the blue text (marked S400) is the smaller of the images and will need no correction--just the code, such as this, shown above:
https://blogger.googleusercontent.com/img/b/R29vZ2xl/AVvXsEiW0WfYsy_i4SwyaYumkQqxeLUFNu54pRYjaZfSPrMVvC1TPTUd7jd65bUanoyRQUUy5h3wInYtFVCoSkf5Co99QUH5n6v9_ZBhOF9fr-fIX6vW0oLQm-kfyfZnyJBk1p1KXlBU/s400/dgblues.jpg
Assuming that the S400 is actually small and not just less than the large one, you could enter that code, as shown, into the Photo Url as your Profile Photo.
END.
Sunday, June 24, 2007
Team Blog
| To create a Team, aka private, blog |
|---|
| 1. From Dashboard, click on Settings. 2. Click on Permissions. 3. Under your own name, you will see Add Authors. 4. Add the new members' email addresses, separated by a comma. Each member will have to accept his/her invitation. 5. You can select below that just Who can read your blog. I know it'll do 5 or 6 at a time, but what the limit may be in that box is unknown to me. |
If you want to make one or all of the team members administrators, just click on the word "guest"; it's like a toggle and will change to "administrator".

If you've recently changed your blog from public to private, but it seems like it HASN'T changed yet, you may need to see this POST ABOUT PRIVACY.ALSO: There is an overall limit of 100 persons that you can have on a private/team blog.
END.
Saturday, June 23, 2007
Email Notifications--Google Groups
| How do I create a group? |
|---|
| 1. Go to the Blogger Help Group forum and look in various locations where it says "Create a group". There is one under the Reply under each question. There's one at the bottom of most pages. 2. If you create a group there, you can add multiple email addresses at one time. Be sure to mark them all to recieve all email notifications. 3. You will be given an email address for the Google Group; copy it. 4. Then, in your blog, go to Settings - Email - Blogsend Address. 5. Enter or paste the email address you were given in the Google Group. Save Settings and you should be through. |
More explicit directions to put a "Subscribe To" box on your sidebar can be found here: Subscribe
END.
Friday, June 22, 2007
Delete A Post Or Draft
| To delete either a Published or a Draft Post |
|---|
| 1. From the Dashboard, Click on Manage: Posts for the appropriate blog. 2. Click the box to the left of the appropriate post. That will highlight the whole line with yellow. 3. Keeping track of the yellow highlight, move to the far right so that you can click Delete there. You will be asked if you are sure you want to delete it. Click on the "Delete It" to confirm it. |
Below is the screenshot to illustrate the above. The sixth line, "Am I Beta Yet", is highlighted with pale yellow because the "delete" box has been checked for it:

Note: when "delete" doesn't work as it should, one temporary fix would be to try the "save as draft" option which has the effect of "un-publishing" the post. It will still be on your Edit Posts list, but your visitors won't see it any more.
END.
Saturday, May 19, 2007
Change Color And Font
| Steps 1--10 to change a font or color in New Blogger |
|---|
| 1. go to the Dashboard 2. click on the Page Elements tab. 3. look up above and click on Fonts And Colors. You'll see a list. 4. on the left side click on which area you want to change color. 5. on the right side click the correct color for that text area. 6. on the left side you may have to scroll down for the font list. 7. then on the left click on which area you want to change text in. 8. on the right side click on the font, size, bold, italics you want. 9. in 4-7 above you can see the changes in the small view window at the bottom of the screen. Sometimes it has a glitch and won't show, but you can make the changes anyway if you are confident of yourself. You will see the change (or not) when you return to View Blog. If you're not confident, try again later. 10. be sure to Save Changes before you exit. |
Things you can change in the list include:
Text Color
Blog Title Color
Post Title Color
Sidebar Title Color
Date Header Color
Text Font
Blog Title Font
Blog Description Font
Sidebar Title Font
Date Header Font
Some detail about Text Fonts:
Text color is the first in the vertical list, but "text font" is sixth; if you click that link, a list of fonts (not previously showing) should appear in place of the color boxes out to the right. Furthest to the right are boxes to check for Smaller, Larger, Bold, and Italic. If you still aren't seeing what you expect, never underestimate the value of "clearing the cache and cookies".
Body (or background) Color
Oddly enough, to change the blog's background color requires going into the template. See if you find a section resembling this from one of my blogs:
body {
background:oldlace; url("xxxhttp://www.blogblog.com/harbor/rocks.jpg") no-repeat right bottom;
background-attachment:fixed;
margin:0;
padding:0;
font:x-small Georgia, Serif;
color:$textcolor;
font-size/* */:/**/small;
font-size: /**/small;
}
or, similarly, this is the code for this blog:
body {
background:#123;
margin:0;
text-align:center;
line-height: 1.5em;
font: x-small Trebuchet MS, Verdana, Arial, Sans-serif;
color:$mainTextColor;
font-size/* */:/**/small;
font-size: /**/small;
}
It's the "body" where you want to make the change or else create the color. Find or alter the color statement--whether you use a number or name doesn't matter. If you have to add the "background: color;", just be sure it's inside the brackets like you see in the two examples above.
END.
Saturday, May 12, 2007
How To Change Your Password
|
END.
Sunday, May 06, 2007
Compose Mode Or Edit Html Mode?
Does your Blogger editing screen look "odd" or wrong?
Is it possible that your screen mode toggled from one to another, either Edit Html or Compose modes? That sometimes happens and people who have never selected the OTHER mode can't recognize what they're seeing. If so, the Blogger edit box has the two choices beside each other in the upper right corner (see screen shot below).

Is it possible that your screen mode toggled from one to another, either Edit Html or Compose modes? That sometimes happens and people who have never selected the OTHER mode can't recognize what they're seeing. If so, the Blogger edit box has the two choices beside each other in the upper right corner (see screen shot below).
| In Compose you can see the photos. You can relocate the image by dragging and dropping it. In Edit Html you will see the code for the photos and will have to use Preview (or switch to the Compose mode) to see images. You can move it by using Cut and Paste on the code. |

| Is your "Compose Mode" turned on? |
|---|
| 1. First go to Dashboard 2. Go to Manage: Settings. 3. Scroll down the page 4. look for "Show Compose Mode for all your blogs?" 5. Activate it by answering Yes. Be sure to click on the big orange Save Settings a little bit further toward the bottom of the page. |
Saturday, May 05, 2007
Sidebar Labels List In Classic Blogger
In order to put a labels list in by hand in the sidebar of Classic templates:
Click on a label below your post and copy its URL from the address bar once the Permalink has opened. Then you can paste this code into the template sidebar :
name of label
< href="url of label Permalink">name of label</a>
When clicked on by visitors, they'll be provided all relevant posts to scroll through, one after another--but not a concise list of titles.
Friday, April 06, 2007
Screenshots In Blogger
How Screenshots Are Done
I used to back away from screenshots in Blogger, though I was not uncomfortable with adding photos the regular way. Now I don't run away like that! If you've never done one, this is how:
END.
I used to back away from screenshots in Blogger, though I was not uncomfortable with adding photos the regular way. Now I don't run away like that! If you've never done one, this is how:
|
END.
Saturday, March 31, 2007
How to Remove Labels
Labels in the sidebar can be made to not show by clicking Remove Page Element.
Multiple labels can be subtracted from posts in the Edit Posts page.
Multiple labels can be subtracted from posts in the Edit Posts page.
| 1. Click on the unwanted label in the left column. 2. All posts of that label only will then appear in the list. 3. Check those posts. You can click All. 4. Open Label Actions by clicking the down arrow. 5. Go down the list to Remove Label. 6. The label you wish to remove should be listed beneath Remove Label 7. If so, click Remove Label. |
Wednesday, March 28, 2007
Google Blog Search
| It used to be that you could click on someone else's "favorite" things in their profile or even in your own profile and you could link to those people in Blogger whose specific interest reflected some of your own. A lot of people have complained about that feature being done away with in New Blogger. You could look up everyone who was interested in masturbation, approbation, Christian Cooking, diabetes, or whatever ticked your clock or worried you. I noticed recently Google has a new Blog Search that is similar, but dissimilar, to the above. It's better than nothing! The search is not limited to any one brand of blogs, but claims it will eventually list all brands of blogs in it's search parameters. Check it out: Google Blog Search |
| Later: The "favorites" feature in your profile has now been restored to Blogger, so you now have two means of searching! |
END.
Tuesday, March 27, 2007
Font Tags As Style Statement
W3C says: The <font> tag in HTML is deprecated. It is supposed to be removed in a future version of HTML.
Even if a lot of people are using it, you should try to avoid it, and use styles instead.
Yipes. I have always used the <font> tags, so I probably have lots of errors out there, but I don't think I'll correct any of them until they truly cease to work. Meanwhile I guess I will try to use the "styles". I'm still teaching myself and will probably step on my own whoosit! But let's plod on and look at the following that you/I might place in a post:
<p style="font-family:Times New Roman;font-size:130%;color:green">
ALL of it should precede the text to be viewed (green text below). View the Source Code for this post if that isn't clear.)
That would be too complicated, I suppose, if you needed it for frequent use or intended it for every post. I need to establish it as a CSS description so that it's on tap when I need it. So I'll add
#fs1 {font-family:Times New Roman;font-size:130%;color:green; }
to my template's CSS (cascading style sheets). The "fs1" is just an arbitrary code that I made up; as long as it is repeated in the code below, any word you choose instead will do.
Reference to the #fs1 is placed in the post thus:
<div style id=fs1> text </div>
Even if a lot of people are using it, you should try to avoid it, and use styles instead.
Yipes. I have always used the <font> tags, so I probably have lots of errors out there, but I don't think I'll correct any of them until they truly cease to work. Meanwhile I guess I will try to use the "styles". I'm still teaching myself and will probably step on my own whoosit! But let's plod on and look at the following that you/I might place in a post:
<p style="font-family:Times New Roman;font-size:130%;color:green">
ALL of it should precede the text to be viewed (green text below). View the Source Code for this post if that isn't clear.)
This is a sentence with some text in it. This is a dizzy sentence with some text in it. This is yet again a sentence with some text in it. This is another sentence with some text in it. This is a sentence with some silly green text in it. This is another silly sentence with some text in it. This is a damn sentence with some text in it. This is a puke-green sentence with some more damn text in it.
That would be too complicated, I suppose, if you needed it for frequent use or intended it for every post. I need to establish it as a CSS description so that it's on tap when I need it. So I'll add
#fs1 {font-family:Times New Roman;font-size:130%;color:green; }
to my template's CSS (cascading style sheets). The "fs1" is just an arbitrary code that I made up; as long as it is repeated in the code below, any word you choose instead will do.
Reference to the #fs1 is placed in the post thus:
<div style id=fs1> text </div>
Saturday, March 24, 2007
Background Color Of A Post
Classic Blogger:
#birdlist {margin:0px;padding:0px;background:navy;color:lightblue;font: 1.1em "Times New Roman","Trebuchet MS",Trebuchet,Verdana,Sans-Serif; font-weight:none; }
</style>
After that is established in the template, any time that in your post you place <p id=birdlist> at the beginning and </p> at the end of that text, you will create the font color and background color that you want. You might change navy to white and lightblue to black, depending on what you want. If you don't invoke the paragraph id in your post, it will just write in black over your current background (if any).
Don't be tripped up by the list of fonts; the computers in the world will choose the first one they come to that they possess. So if you choose a really new and esoteric font, you may be the only reader who sees it in just that font. But they will see it in the second, third, or fourth font listed.
THE END.
In your template, just before the closing tag </style> occurs, place the couple of lines below (which you can change to your colors or fonts). This will just be an example you can start with as a test. This paragraph demonstrates what the code below causes.
#birdlist {margin:0px;padding:0px;background:navy;color:lightblue;font: 1.1em "Times New Roman","Trebuchet MS",Trebuchet,Verdana,Sans-Serif; font-weight:none; }
</style>
After that is established in the template, any time that in your post you place <p id=birdlist> at the beginning and </p> at the end of that text, you will create the font color and background color that you want. You might change navy to white and lightblue to black, depending on what you want. If you don't invoke the paragraph id in your post, it will just write in black over your current background (if any).
Don't be tripped up by the list of fonts; the computers in the world will choose the first one they come to that they possess. So if you choose a really new and esoteric font, you may be the only reader who sees it in just that font. But they will see it in the second, third, or fourth font listed.
| New Blogger |
|---|
| The main difference here is that you don't make the addition in the same place. When you open the template, you need to search for the Style items that you know, though they are not called that! Search for "Body" and other style (CSS) listings that you might already be familiar with. You might see something like this: body { background:oldlace; url("http://www.blogblog.com/harbor/rocks.jpg") no-repeat right bottom; background-attachment:fixed; margin:0; padding:0; font:x-small Georgia, Serif; color:$textcolor; font-size/* */:/**/small; font-size: /**/small; } Put the additional (birdlist) lines after the above, but BEFORE the closing } bracket. There are other places that would be correct, and I'm just pointing out one. This #ID is not limited to paragraphs; it could also be applied to a <div>, etc. |
THE END.
Sunday, March 18, 2007
How To Query Blogger Help Group
| Five Helpful Tips On "BHG" Protocol |
|---|
1. Give your URL (blog address). 2. GIVE DETAILS: State the specifics of your problem or question. Are you Classic or New (Beta) Blogger? Do not speak in a telegraphic style or assume we know all the latest abbreviated jargon--we have time here for ordinary language. 3.THREADS (Conversations) A. Don't pile onto a long thread if your issue is not the same. "Start a new topic," as it says at the top of the Blogger Help Group page. You'll get more results. B. However, don't start a new thread if you want to say "I have the same problem as him or her!" Place your message on the same thread so it'll stay there! Threads can change sequence because newly posted or updated ones go to the top of the group--thus causing your separate, abandoned thread to make less sense. C. Don't repeat your message in every category of this forum; it just makes things messy. If you're not a jerk, stay on one thread until the end of the conversation. If you are a jerk, just hang on until I have time to kill you. 4. REACHING BLOGGER: It cannot be emphasized too much that you should get your plea for help (if any) filed with Blogger Support now, soon, so that when and if they send you those damn automated responses, you can start writing back to them asking for human help! Be persistent, not rude. 5. DELETE YOUR MESSAGE: If you find that you put your query in the wrong category and want to put the message in a different category, or if you just realized you've asked a jackass question, or for whatever reason, YOU CAN DELETE the first posting. a. Click "More Options" in the upper right-hand corner above the question. b. Click on the "Remove" option. c. Then click on "Yes, Remove it now". d. Then click "Confirm". |
BLOGGER SUPPORT:
http://help.blogger.com/?page=contact
Thursday, March 15, 2007

Friday, March 02, 2007
FTP Users Can't Use New Blogger
At present, FTP users cannot avail themselves of the new features in New Blogger. I don't know why; Blogger says so.
It may be of interest to FTP users to investigate the new Custom Domains with Blogger, where you can use all the New Blogger features. Go HERE to read about it in a Blogger help file.
END.
It may be of interest to FTP users to investigate the new Custom Domains with Blogger, where you can use all the New Blogger features. Go HERE to read about it in a Blogger help file.
END.
Saturday, February 24, 2007
Change Font In Posts
| In New Blogger: |
|---|
| 1. go to Dashboard 2. go to Layout 3. click on Fonts and colors 4. click Text Font in box at left 5. locate list of font styles at right 6. click one. 7. click Save Changes when finished END. |
Thursday, February 15, 2007
How To Upgrade A Migrated Blog
When a blog has been Migrated to the New Blogger servers (all blogs now are), but the template has not been Upgraded, you will not yet have access to the additional features of New Blogger. You can continue to sit on your Classic template if you wish. You do not have to Upgrade, but you can.
Current instruction page from Blogger: http://help.blogger.com/bin/answer.py?hl=en&answer=44474
If you have been used to a customized template, the system will save a copy of your current template. You will be stuck with this new template until you can re-customize it, bit by bit. You CANNOT replace the New template with your Classic template with Copy and Paste. They are incompatible. However, if at length you cannot stand New Blogger, you can REVERT to the Classic template. But you cannot leave the New Blogger servers nor can you refuse to migrate to them when advised to do so. If you are a new blogger, you likely started out in Layout mode and are better off there, though it is possible to change to a Classic template.
Current instruction page from Blogger: http://help.blogger.com/bin/answer.py?hl=en&answer=44474
| Original New Blogger Instructions |
|---|
| Customize Design : To Upgrade, look for the tab beneath "Template" that says "Customize Design" and click on it to select a new template. |
| My Version Of Instructions |
|---|
| Customize: 1. Click on "Customize" in the Navbar above your blog. 2. You'll see some instructions that terminate with "Learn more about Blogger Layouts customization". 3. The last few words of that line is supposed to be a link that you can click on to proceed. If it doesn't act as a link, use the Refresh button and clear your cache and cookies to correct it! |
If you have been used to a customized template, the system will save a copy of your current template. You will be stuck with this new template until you can re-customize it, bit by bit. You CANNOT replace the New template with your Classic template with Copy and Paste. They are incompatible. However, if at length you cannot stand New Blogger, you can REVERT to the Classic template. But you cannot leave the New Blogger servers nor can you refuse to migrate to them when advised to do so. If you are a new blogger, you likely started out in Layout mode and are better off there, though it is possible to change to a Classic template.
Wednesday, February 14, 2007
The Blogger Help-Blogs List
I used to think there were only 3 or 4 such blogs, but it seems to me like there are twenty or more. I'll have to count them on fingers and toes and hope they don't exceed my grasp! Here are the ones that I've heard of, but I won't categorize or put them in any order. I may have included some bad ones or left out some good ones--but I can always revise as I go!
| Useful Blogs |
|---|
Monday, February 12, 2007
Wishlist
Blogger seems to have cancelled the Wishlist at present.
If you long for the return of Previous Posts, or the links from your profile's "favorites" to the profiles of others with similar interests, or if you know of other features which have now disappeared from (or were never in) the current version of Blogger, you can contact Blogger for that purpose at:
As of 8/07/07 FAVORITES: Blogger has returned the use of the links to other "favorite" subjects across the blog world. Some of you were always bitching about it, and maybe Blogger heard you. But they never said it was coming back!
END.
| The Wishlist http://help.blogger.com/?page=wishlist They may not answer you, but at least you'll have given them your two cents worth! |
As of 8/07/07 FAVORITES: Blogger has returned the use of the links to other "favorite" subjects across the blog world. Some of you were always bitching about it, and maybe Blogger heard you. But they never said it was coming back!
END.
Saturday, February 10, 2007
Edit The Template
| How to edit or add to the template |
|---|
| Old Blogger; 1. From the Dashboard, click on Template. New Blogger: 1. From the Dashboard, click on Layout. OR 1. From the Navbar, click on Customize. 2. Then click on Edit HTML to edit the template. Now you have to know what you're doing. If you are in New Blogger, you may wish to place the code in a page element instead. |
END.
Thursday, February 08, 2007
Remove Content From Google Index
Request removal of content from Google's index:
http://www.google.com/support/webmasters/bin/answer.py?answer=35301
Warning: It does not appear that Blogger is very active in helping anyone with this, despite having this help site. The truth may be that you might as well talk to a lawyer and have him talk to Blogger if it comes to that. Blogger will not promptly save your donkey.
END.
Request Site
http://www.google.com/support/webmasters/bin/answer.py?answer=35301
Warning: It does not appear that Blogger is very active in helping anyone with this, despite having this help site. The truth may be that you might as well talk to a lawyer and have him talk to Blogger if it comes to that. Blogger will not promptly save your donkey.
END.
Report Spam To Google
Don't be timid. If you THINK it's spam, report it to Google at
Google Spam Report
http://www.google.com/webmasters/sitemaps/spamreport?hl=en
END.
Google Spam Report
http://www.google.com/webmasters/sitemaps/spamreport?hl=en
END.
Tuesday, February 06, 2007
Where To Place A Graphic For The Header
| New Blogger method, easier for most |
|---|
| 1. In Dashboard go to Layout. 2. Click Header in the Layout. 3. Have the url of the image you want to use handy. 4. Type or paste or Browse for the url into one of the two Image boxes, 5. Either an image on your computer or one already hosted on the Web. 6. You can choose to add the photo Behind the Title and Description or 7. You can Replace the Title and Description with the photo. 8. Be sure to Save Changes. |
I can't emphasize how much easier the method above is!Below is the old (Classic) method
This method still useable and ultimately more flexible (but you may be well satisfied with the first method above):
The code you'd look for to put a graphic into the header seems to come from a variety of locations in your template. It might go in the #header or #header-wrapper. The method I usually use is to locate a background url that already exists like these:
#header {
margin: 0 2%;
background-color: $headerBgColor; background:url("
http://2.bp.blogspot.com/_AVxLoZ0mR_0/Rb_W1nLeYQI/AAAAAAAAAIg/
qCR5JYhLf6o/s1600/dgblues.jpg") no-repeat bottom 10px;
color: $headerTextColor;
padding: 0;
font: $headerFont;
position: relative;
}
or
#wrap2
{background:url("xxxhttp://4.bp.blogspot.com/_AVxLoZ0mR_0/
RcNxJHiGO3I/AAAAAAAAAKA/5GfVtiwhGRE/s1600/jg2.jpg")
no-repeat center top; }
If this doesn't make anything more clear, ask again. I won't mind. But I don't know everything!
------------------------------------
It also worked for me to place an extra html/javascript page element above the header, with code like below:
<a href="http://jgblues.blogspot.com/"><img top
src="http://4.bp.blogspot.com/_AVxLoZ0mR_0/RcNxJHiGO3I/AAAAAAAAAKA/
5GfVtiwhGRE/s1600/jg2.jpg" no-repeat center/></a>
but first you'll have to go into the header widget in the template and change it so that the extra header is allowed, like this:
1. Go to Template.
2. Click on Edit Html
3. Click on Expand widget templates.
4. Locate the header widget.
5. It might look like this:
<b:section class='header' id='header' maxwidgets='1'>
6. Change the maxwidgets number to 2 or more.
7. If there's a showaddelement='no', change it to say 'yes'.
8. I don't advise removing the old header entirely unless you can otherwise preserve the title for the search engines, but if you mean to try, I understand that you'll have to change locked='yes' to 'no'.
9. Save your new template.
Some have remarked that they have no header at all, and I don't know what that's about. In new blogger, you might find a section like this, which reflects the fact above that I have the mentioned html/javascript page element added to that header.
<b:section class='header' id='header' maxwidgets='4'><b:widget id='HTML6' locked='false' title='' type='HTML'/><b:widget id='Header1' locked='true' title='JUDY GARLAND BLUES (Header)' type='Header'/></b:section>
Various statements of fact and warnings on this subject may be missing or careless at present, so beware.
Thursday, February 01, 2007
Changing Templates In New Blogger
You have to change, but you don't have to change!
At some point soon, most of you who have held back will be forced to make the change to New Blogger. When you get there (are Migrated), you may not have to change your template immediately or even for a long while.
Those of you with a heavily customized template can (sorta) keep it!
However, you can't quite keep your own--not if you upgrade! Sadly, if the time comes when you have to or want to change to a new template so that you can utilize the full range of new features in New Blogger, then you may as well realize going in that the template choices are few. You may find them all dull and boring.
Cheer up if you're dumping an attractive customized template! It will take work, but just choose one and let the system Upgrade your template. Later, as time goes by and you learn how things work in the new set-up, you can begin to make the changes in your new template so that it will resemble your old one.
Keep a copy of your old template for reference. You will be able to Copy and Paste portions of it into the new template, as well as restore the additions you made to your old css code that are not in your new template.
Monday, January 29, 2007
Missing Archive In New Blogger
| These are some guesses since I haven't heard much feedback about it |
|---|
| 1. See if the Archive page element is activated. 2. If it is, delete it and then re-Add it. 3. If that doesn't work, check Settings-Archiving. 4. Change the Archive frequency (temporarily) to something else just to see if that will wake up the system. Click Save Settings at the page bottom. |
Let me know if it works out. I need to find out if I'm full of moonbeams to make these suggestions.
END.
Sunday, January 28, 2007
Bx Error Codes
I am placing this info above the older information below; this may be of more help to you. It's a Blogger form to report to and maybe find out what your particular BX code may mean:
Form for BX error codes:
Form for BX error codes:
I've never yet understood what Blogger thinks we can do (at Blogger Help Group) with these bx error codes. They are evidently working up a more organized system, but I haven't been let in on it yet!
After hearing from Chuck the nitecruzr, I learned that if you search for instance for bX-x082n7 in the Help Group, you'll find a large # of threads concerning the same topic with the same ID--failure to post or failure to save a draft. But so far I've seen no great information on it. Though Blogger Employee keeps telling us that they're on the case, for me this is too much of having to guess my way through their new problem-solving system!
Use the search feature yourself to search for your ID, but I don't know if you can discover much. The complaints are all about the same, and most people don't provide detailed enough info about what they were doing like Blogger asked. You may not learn more than you yourself observed.
If you haven't already, send your ID and other info to Blogger Support and hope that they can sort it out.
BLOGGER SUPPORT
BLOGGER PROBLEM REPORT FORM
BLOGGER HELP FORM
END.
Saturday, January 27, 2007
Mailto, Or "Email Me" Link
If still using Classic Blogger, you would have to add the mailto code in the appropriate place in the sidebar. If you're using the Layout template, you'll do the following:
Of course, put your address in it, not mine! You can change the "Email me" wording.
Save Changes when you've finished with the html in the page element.
--------------------------------------------------------------------
Mailto, with a picture (or button) link:

Format for above Mailto picture link:
<a href="mailto:YourEmail@what.com"><img src="http://FullUrlOfPhoto" alt="Click to email Mortimer Snerd"></a>
| Add an email link in your blog: |
|---|
| 1. On the Navbar, click on Customize. 2. Click on Add A Page Element. 3. Click Add To Blog under your choice of page element. 4. for adding a mailto, add an html/javascript page element. 5. Put the following html code into it: <a href="mailto:ratsouthern@gmail.com">You can email me here!</a> |
Of course, put your address in it, not mine! You can change the "Email me" wording.
Save Changes when you've finished with the html in the page element.
Mailto, with a picture (or button) link:
Format for above Mailto picture link:
<a href="mailto:YourEmail@what.com"><img src="http://FullUrlOfPhoto" alt="Click to email Mortimer Snerd"></a>
Wednesday, January 24, 2007
Timestamp Format
How to display your time format under the post:
1. Click Settings.
2. Click Formatting.
3. Click Timestamp Format. Select a time display.
4. Save Settings at bottom of page.
END.
1. Click Settings.
2. Click Formatting.
3. Click Timestamp Format. Select a time display.
4. Save Settings at bottom of page.
END.
Sunday, January 21, 2007
Change The Url (Web Address)
| Change URL |
|---|
| 1. Go to your Dashboard. 2. Click on Settings. 3. Click on Publishing 4. The first box down the page is where you change your portion of the Blogspot url. It is of course subject to availabilty, and they will let you know while you sit there. No long waiting. 5. Scroll down and Save Settings. |
If your blog has been in existence for any length of time or if there have been very many links already made to it, you ought not to change it. You may also have to resubmit any forms you've filed with the search engines.
Don't worry about the Archive posts. All of them will be appropriately changed.
END.
Saturday, January 20, 2007
Page Elements Screen
This post was written before several of the new categories, such as the Blog List, Slideshow, or Video or Poll, so that the screenshot below will not quite match what you would currently see. Sorry, someday I'll catch up.
Some people still complain they can't see this item. Sometimes it helps to use Refresh (F5 or Ctrl-F5) or to clear your cache and cookies (in Internet Options-Tools). At times, you might even have to do it twice.
Here is a partial screen shot of the Page Elements list. Others listed below my screen shot are "Logo, Profile, Blog Archive, and Page Header". It is easy to select one and add it.
Click on page-element in the Label box below for other posts on this topic.

See also: Text and Html/javascript page elements
END.
Thursday, January 18, 2007
Clickable "Button" Link To A Web Site
Making a clickable "Button" (or picture link) that links to a web site:
Below is an example:
<a href="http://rodentia.blogspot.com/"><img src="https://blogger.googleusercontent.com/img/b/R29vZ2xl/AVvXsEibo3sP8dHAdCdPBQnjx9UejLp7nxgMBef8xwsA-KelB0HStlcYqiQgveMXIwBEqe94uRTOJg3Ke6LYnpS8LRc6Z6wSemzI1ruA-tPpLY7idN38Go9nRHc-fM6S0xr_nUDfuTM6/
s400/RatsHaveRights.jpg"></a>
The "<a href=" part is the link and the "<img src=" is the photo-image-button readers will click on.
Below is the general format:
<a href="yourLink.com"><img src="yourImage.jpg"></a>
See also Links As Code
Tuesday, January 16, 2007
Create A New Post?
I need to create a new post, but how?
METHOD 1:
In your Navbar, click on New Post.
OR
METHOD 2:
On your Dashboard, click New Post under the relevant blog.
OR
METHOD 3:
1. When logged in to your blog, click on Customize in the Navbar.
2. Then click on Posting
3. and then click on Edit Posts
OR
METHOD 4:
If those icons aren't showing, check to see if the pencil icon under each post is
visible? If so,
1. Click on the pencil
2. you should be able to see Create and Edit Posts up above
3. Click on Create.
BUT
If these icons aren't showing and you've done all that you can about Refreshing (Ctrl-F5), clearing the cache and cookies, trying another browser, and so forth (see my EMERGENCY STEPS at the top of this blog), you may only be able to get help from a direct appeal to Blogger Support. Though that process is often slow, they're at:
BLOGGER SUPPORT
http://help.blogger.com/?page=contact
OR
BLOGGER PROBLEM REPORT FORM
http://help.blogger.com/?page=troubleshooter.cs&problem=&contact_type=bug_with_blogger_beta&Submit=Submit
[Be sure you're logged in to your blog, of course, when you try any of the methods above.]
Monday, January 15, 2007
Language Settings
| Start at your Dashboard |
|---|
| 1. click on Settings 2. click on Formatting 3. go down the page 6 boxes to find Language 4. to the right of Language click the box and you'll see a long list of languages on the drop-down menu. 5. Don't forget to Save Settings at page bottom. |
[More below...screenshots, etc.]
Screenshot of Settings and Formatting Screenshot of language list in Formatting.
 [Language list above is just the first few; the real menu continues to scroll.
At the very bottom of the Settings menu, there's a box to Enable/disable transliteration. If you're seeing Hindi and you're from Nevada, you need to disable it!]
More thorough details can be read at Make Your Blog Speak Your Language, by nitecruzr.
Wednesday, January 10, 2007
Page Elements--Html/Javascript & Text
The Html/Javascript Page Element Is Better!
At first I chose some Text Page Elements for my information at the top of the blog, but I have since changed it to an HTML/JAVASCRIPT Page Element. For some reason, both require line breaks in order to separate the text into paragraphs. Fair enough, I can do that. But the Text element loses those line breaks every time you return to do some editing, and that's crappy.
So if you had paragraphs or any kind of one-line-at-a-time "grocery list", you'd have to revamp the post to restore it to what you started with! Not hard, just time-consuming!
Text page elements are only good for a straightforward paragraph of information or for some other kind of information that you don't have to edit often.
In the HTML page element, nothing changes or is lost, and you can just edit what you meant to without a lot of special revamping. This is important to a ceaseless reviser like me--I often re-edit!
It is misleading to all users that we are able to put HTML into a Text page element when it's so problematic to do so! And there should have been a warning about this difficulty with making paragraphs. Anyway, fair warning from me!
Change Your "About Me" Title
Trips Into Space?!
I'm not certain if you can change it in Classic Blogger, but in New Blogger you can easily change your About Me to read something else. Mine reads "Lies About Me". Yours could say "My Trips Into Space", or whatever you like.
In New (beta) Blogger:
1. Unless you have been an idiot and deleted the "crossed tools" editing icon (wrench and screwdriver), go to the crossed tools under your "About Me" section.
2. Click on the editing icon.
3. A popup window will open with various information fields that you've probably already filled in when you created your blog.
4. The title "About Me" appears at the top and you can delete and/or replace it.
5. Click on Save Changes before you're through.
The change will usually be instantly visible when the popup window closes. If not, try Refresh (F5). You can go back to this editng box as many times as you need to.
See also: Have 2 or More Profiles On One Account"
I'm not certain if you can change it in Classic Blogger, but in New Blogger you can easily change your About Me to read something else. Mine reads "Lies About Me". Yours could say "My Trips Into Space", or whatever you like.
You cannot however change the "See My Complete Profile" because that is one of the things that belongs to Blogger and isn't accessible to you or me, not that I have been able to discover. Sad, but true.
In New (beta) Blogger:
1. Unless you have been an idiot and deleted the "crossed tools" editing icon (wrench and screwdriver), go to the crossed tools under your "About Me" section.
2. Click on the editing icon.
3. A popup window will open with various information fields that you've probably already filled in when you created your blog.
4. The title "About Me" appears at the top and you can delete and/or replace it.
5. Click on Save Changes before you're through.
The change will usually be instantly visible when the popup window closes. If not, try Refresh (F5). You can go back to this editng box as many times as you need to.
See also: Have 2 or More Profiles On One Account"
Tuesday, January 09, 2007
Change Time-stamp Format of Comments
[This works for Old or New Blogger]
Next to your Template button, on the left, are your Settings. You can choose a time-stamp format (time, date, or time-date variations) for the comments from a list.
1. Click on Settings.
2. Click on Comments.
3. A little down the page you'll see Comments Timestamp Format.
4. Click the arrow out to the right and it'll show you a list to choose from.
5. Go to page bottom and Save Settings before you exit.
Friday, January 05, 2007
Turn Off Comments In One Post
Disallow Further Comments
1. Go to Manage Posts.
2. Locate the right post.
3. Click on Edit.
4. Below the Post Editor box, click on Post and Comment options.
5. Click "No" on Allow New Comments on this post.
6. Publish.
1. Go to Manage Posts.
2. Locate the right post.
3. Click on Edit.
4. Below the Post Editor box, click on Post and Comment options.
5. Click "No" on Allow New Comments on this post.
6. Publish.
Subscribe to:
Comments (Atom)


