| I found a curious thing, though I may be among the last to discover it. I just took a recently-created blog, played with it, then subjected it to the "Revert to Classic" button. Oddly enough, the system "reverted" it even though it had never been a classic template. I didn't test everything about it, but I thought it was very curious. Maybe someday I'll think of some use for this marvellous piece of information. Till then, la di dah... |
Thursday, November 29, 2007
Revert To Never-Never-Land?

Wednesday, November 21, 2007
Change Email Options In Google Subscription List
| 1. Go to your subscription page where all the posts are listed. 2. Find the "Edit my membership" icon on the right and click it. 3. Then you'd have a page listing the options about email choices. 4. Select one option. 5. Be sure to click "Save these settings". |
Saturday, November 17, 2007
Table for Horizontal Photos In Post
| Ronald | Southern |
|---|---|
 | |
Haven't done any of those in a while. Tedious.
Below is the code that makes a small table like the one above have photos side by side:[Those of you wishing to cut to the chase quickly, start reading the large yellow-highlight area below, which is below the fourth straight red line.]
<center><table border=4 width=95%><tr><th align=center>Ronald</th> <th align=center>Southern</th></tr><tr><td><img src=\"https://blogger.googleusercontent.com/img/b/R29vZ2xl/AVvXsEhzaOEgOjpEK1oRv_I88gykcbl-wVKUiaG4nUQTbzGx7OYC3F7ugr-QGGpk7nkrUl9CmLjxGYJeuuwlbY_sHmShNTEHKfSvwho-qveJ9aXts9OR9qeLwErBJvBpwa4pmQ1LeSFP/s1600/twinkiebite.gif\" /> </td> <td><img src=\"https://blogger.googleusercontent.com/img/b/R29vZ2xl/AVvXsEhzaOEgOjpEK1oRv_I88gykcbl-wVKUiaG4nUQTbzGx7OYC3F7ugr-QGGpk7nkrUl9CmLjxGYJeuuwlbY_sHmShNTEHKfSvwho-qveJ9aXts9OR9qeLwErBJvBpwa4pmQ1LeSFP/s1600/twinkiebite.gif\" /> </td></tr></table> </center>
[More below...]
A MORE SIMPLISTIC SAMPLE OF A TABLE (followed by its code) is shown below:
| PICTURE | OR TEXT |
<table border=2>
<tr>
<td>PICTURE</td>
<td>OR TEXT</td>
</tr>
</table>
PREVENT LINE BREAKS:
In order for the Table not to cause extra line breaks in Blogger posts, there are two methods:
Method #1: You may need to copy it out like this (no line breaks of your own):
<table border=2><tr><td>PICTURE</td><td>OR TEXT</td></tr></table>
--To create additional row(s), add another set of "table records" such as
<tr><td>picture or text</td></tr>
as needed. Place them after the first table record and before the end tag, </table>.
--Remember that the photos cannot exceed the width of the area where you are placing them or else it will create problems, probably your sidebar being pushed down.
Method #2: This is something I've tried a number of times now. It does seem to be very effective, especially if you're going to use tables often. It is not good, though, for creating a table around a list (numbered or otherwise) because it will remove the page breaks and show the list as if it's a regular paragraph. It'll make the info resemble a traffic jam. This method makes the change in this way, using css:
Table Formatting In CSS
My explanation of the Table Formatting (Method #2) which I learned from the site above is as follows--changing the table in the CSS: |
Wednesday, November 07, 2007
How To Hide Comments
| Turn Off Comments |
|---|
|
END.
Sunday, November 04, 2007
Where Is "Style" In New Blogger?
|
END.
Thursday, November 01, 2007
Adding Pages
| Adding Pages, MS Word Documents, Spreadsheets Some people want to add pages other than just another post, maybe something with a document or spreadsheet look. They should check out: |
| Google Docs and Spreadsheets |
| Google Sites |
| I only used Google Docs for implementing MS Word documents, so I have limited experience. Google Docs worked very well for me, much better than merely trying to put a Word document into the Blogger Editor—and, of course, you can't "attach" a document as you can in emails! If you can create or paste your file in Google Docs, you can of course create a link to it from your blog or elsewhere. Other programs said to be useful in this situation are: |
Monday, October 29, 2007
Having Your Titles Show In Archive
If you want your Archive to show your own post titles (as opposed to all dates), set your "Configure Blog Archive" page element like this screenshot. Make sure that "Hierarchy" and "Show Post Titles" are both marked.
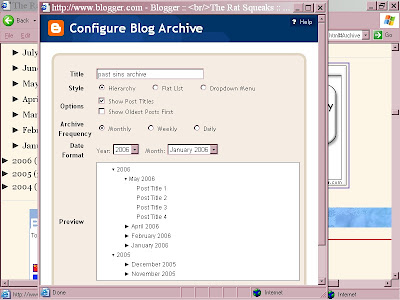
[click image to enlarge]
If your Archive list is not seen in the sidebar, check the page elements in the Layout page and see if it has been deactivated. If not turned on, you should add it. Look carefully at its settings, then save them.
END.

If your Archive list is not seen in the sidebar, check the page elements in the Layout page and see if it has been deactivated. If not turned on, you should add it. Look carefully at its settings, then save them.
END.
Friday, October 19, 2007
Find Width of Header For New Image
| Header Width |
|---|
| This will tell you places to look for the width of your header. The image you want to place there should not exceed that. You should use a photo program to alter the width of your image BEFORE you upload it to your photo host (whether Blogger or otherwise). To find the width of the header 1. Click Template 2. Click Edit Html 3. Scroll down to the header,header-wrapper, or wrap code and look for the WIDTH parameter. 4. If not found, look for outer-wrapper and see it's width. It will look something like this : #outer-wrapper { width: 1000px; } |
Or you could adjust the same WIDTH in the template CSS
If you are unwilling to fuss with making your photo width match the width of the header, you could try this. You might find some code like the one above or this one below showing the #wrap; change the width of 100px to 900, 850, or so until it begins to look acceptable to you. Don't Save until then. If your photo just wasn't nearly wide enough, it may still look odd (short) to some eyes. Actually adjusting the width of your image in a photo program would then be the better choice.
| Another possible location of header width: #wrap { margin: 10px auto 0px; padding: 0px 5px; width: 900px; text-align:left; } |
END.
Thursday, October 18, 2007
Preformatted Text--Show Spaces and Html
ee cummings's defunct |
Dear mr cummings: I know you're dead, but you might try putting the text of your poems between these tags:
<pre> text </pre>
This means that it will accept the preformatted text exactly as presented, though usually not in fancy fonts. The pre tags are also useful for computer codes if you don't wish to use the html ampersand codes or otherwise translate the special coding signs.
[More below...]
The PRE element contains preformatted text. Visual browsers should render preformatted text in a fixed-width font, should not collapse whitespace, and should not wrap long lines.
PRE is useful for formatting computer code or poetry where whitespace is important, but since preformatted text is inherently visual, authors should avoid dependence on it wherever possible. When using PRE, authors should avoid altering the element's fixed-width font or non-collapsing whitespace properties by means of style sheets.
| related matters: |
|---|
| -- NON-BREAKING SPACES can be used as extended space or as a tab. A non-breaking space looks like this: Three of them would be simply: An ee cummings poem, though, might drive you crazy, so be cautious! SHOWING HTML CODE: -- AMPERSAND CODES can be used in short sections to show the code itself (which is what I did to show the non-breaking space code above). HTML Ampersand Character Codes -- For longer sections that need to be "translated" or if you're lazy, the programs below convert html code for you. Both work well, though Postable's first screen is a little less intuitive. For Postable's mysterious first screen, just left-click the mouse on the phrase in the upper left corner, "for your copy and pasting pleasure" and, when the screen clears, you can enter the code you want it to fully display. Next you click on "Make it friendly" in the lower right corner and it will do so. Right-click the mouse and Copy the highlighted text, then paste it where you intend it to show. Postable Quick Escape |
END.
Thursday, October 11, 2007
Centering Header Image
| A. First try making the image the right size |
|---|
| To center image in the header, use a photo program to resize the width of the image to fit the size of the header. To find the width of the header 1. Click Template 2. Click Edit Html 3. Scroll down to the header,header-wrapper, or wrap code and look for the WIDTH parameter. 4. If not found, look for outer-wrapper and see it's width. It will look something like this : #outer-wrapper { width: 1000px; } |
[More below...]
| B. Or you could adjust the same WIDTH in the template CSS |
|---|
| If you are unwilling to fuss with making your photo width match the width of the header, you could try this. You might find some code like the one above or this one below; change the width of 100px to 900, 850, or so until it begins to look acceptable to you. Don't Save until then. If your photo just wasn't nearly wide enough, it may still look odd (short) to some eyes. Selection A would then be the better choice. #wrap { margin: 10px auto 0px; padding: 0px 5px; width: 1000px; text-align:left; } |
Hopefully you made a safety copy of your template before you started monkeying with the code or making any changes--you know, in case all hell breaks loose and you need to rescue yourself!
Subscribe to:
Posts (Atom)


