Below in red is the code for the two small tables shown above. The style definition NOBR is invoked to prevent a pile of line breaks on top of the table, which is something I use for every table. There are also some artificial line breaks that had to occur in the long url's; this was done to prevent the table margins from getting wacky! <div class=nobr> <table border=2> <tr> <td>PICTURE1</td> <td>PICTURE2</td></tr> <tr> <td>Caption1</td> <td>Caption2</td></tr> </table> </div> <div class=nobr> <table border=2> <tr> <td><img src="http://3.bp.blogspot.com/ _AVxLoZ0mR_0/R0tYGSDQasI/AAAAAAAAAcI/ fNyWP--ziLI/s1600/twinkiebite.gif" /></td> <td><img src="http://3.bp.blogspot.com/ _AVxLoZ0mR_0/R0tYGSDQasI/AAAAAAAAAcI/ fNyWP--ziLI/s1600/twinkiebite.gif" /></td></tr> <tr> <td align=center>Caption1</td> <td align=center>Caption2</td></tr> </table> </div> |
Showing posts with label photo. Show all posts
Showing posts with label photo. Show all posts
Wednesday, May 27, 2009
Captioned Photos In A Small Table



Saturday, February 21, 2009
Have Two or More Blogger Profiles
| Make Your Own |
|---|
Placing direct information and a photo into the sidebar to replace the Blogger "About Me" Profile OR because you want more or different info/pictures in your profile! You may desire to put hyperlinks or other items there which you cannot place in the official Profile. For different reasons, some people even want to be able to have a different Profile on different blogs on the same account. This is a workaround to achieve that goal. By placing the code for an image and your own personal info directly into the sidebar or page element, AND by suppressing the Blogger Profile, you can work around the problem. You'd have to eliminate the Blogger Profile entirely (mark it as NOT to be shared, either in Edit Profile or in the Profile page element). [Remember, these profile substitutes will only appear on your blog while the original official Profile will still be what's available to persons where you leave comments on other blogs!] |
[More below, with screenshot...]
First thing is to find a photo. My Blogger Profile pic is 88x68 pixels, but of course that's only how it shows in the sidebar. The photo size I submitted was 320x240 pixels. I don't currently know how much larger you can go, but I've seen some that were very large in other Profiles. Obviously, what we'll need in the sidebar is one of those pics such as Blogger pics turn out that are shown larger when clicked on.
For the test photo I use further down the page, I started with a medium photo in a photo program where I could copy it and resize the copy. Thus I had a thumbnail and a larger pic, as so many of us are used to.
My thumbnail here is larger (123x92)than the profile photo I actually use, but it fits in the sidebar, and that was my only goal. So I took the two photos and fitted them into the formula as below.
Once the images are hosted online, you can copy the code and place it in the sidebar, probably looking something like this:
<a href="PhotoUrl"> <img src="smallPhotoUrl" />
</a>
| Below is the actual code for the fabricated Profile I made up in a practice blog (shown further down the page). The code should be entered in an html/javascript page element in New Blogger or in the sidebar section of the template if you are still using a Classic template. |
<center><a href="http://4.bp.blogspot.com/_AVxLoZ0mR_0/Rc6Xl8IUJzI/AAAAAAAAALA/
BwKtMwuI4ek/s1600-h/Picture+17.jpg"> <img src="https://blogger.googleusercontent.com/img/b/R29vZ2xl/AVvXsEhtEqSABK9qbnoWe85CNI7_3Tmm2W03LckaXYS5Y25AX-gvh-gxWVfwBjvhSKRKxuyoMnyBrTipOk6t6lfFPbLU-iEIBtgn65v8u6lQGoLgT3QNw9wroOXqamloC-HoMbY1s29V/s1600/picture17-small.jpg"/> </a>
<br/>
<b>Clower McFlowers, <br/>
Chigger, Texas, USA <br/><br/></b></center>
Clower is a mean bastard, but he's our mean bastard! I can put whatever other info I want to include here. Might even insist that my name is Mortimer Snerd. Can't never tell. I was born in Montana. On horseback. In the rain. Yeah, that's it. And I'm a negro, too.
Below is the screen shot.

Thursday, February 12, 2009
How To Post Photos
The most direct way to get photos on your post is to use Blogger's picture icon:
There are alternate free photo hosts such as Picasa, Photobucket, Flickr, etc. With some of them, costs may ensue if you exceed their limits. Try any of them, though, as alternatives when your photo host is troublesome. One may work when another one does not.
There are several useful screenshots below!
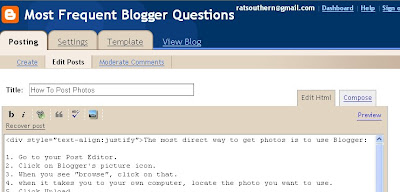
First is a screenshot of the top part of this post in the Post Editor. It shows the Blogger picture icon, the tiny rectangle that's blue in the top half, and primarily green in the bottom half.]
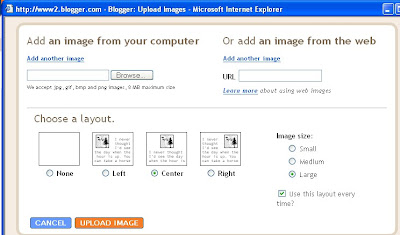
[Below are screen shots of the photo download process.]
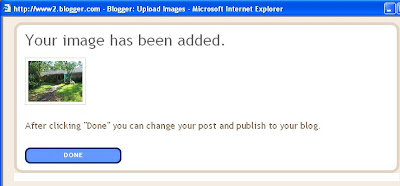
New images always load into a post at the top. If you view the image in Compose mode, you can Drag and Drop it to other locations; if you are viewing it in Edit Html mode, use Cut and Paste to relocate it.
END.
| 1. Go to your Post Editor. 2. Click on Blogger's picture icon. 3. When you see "browse", click on that. 4. when it takes you to your own computer, locate the photo you want to use. 5. Click Upload. 6. Click on Done. 7. If you uploaded to a post different from where it's intended to go, possibly even on a different blog, Copy the html code. 8. Paste the code into the right post. |
There are alternate free photo hosts such as Picasa, Photobucket, Flickr, etc. With some of them, costs may ensue if you exceed their limits. Try any of them, though, as alternatives when your photo host is troublesome. One may work when another one does not.
There are several useful screenshots below!
[More below...Screenshots]
First is a screenshot of the top part of this post in the Post Editor. It shows the Blogger picture icon, the tiny rectangle that's blue in the top half, and primarily green in the bottom half.]

[Below are screen shots of the photo download process.]


New images always load into a post at the top. If you view the image in Compose mode, you can Drag and Drop it to other locations; if you are viewing it in Edit Html mode, use Cut and Paste to relocate it.
END.
Sunday, January 18, 2009
Small/Large Photos
| "How do I get my pictures to enlarge when I click on them?" I don't keep track of all the other photo hosts, but Blogger downloads your photo in a sort of dual system so that a small image is made that fits the area (post or sidebar) and then you can click on it for the full-size large version. I used to do the same thing by hand when I made my own web sites by making both a small and large version of a picture and placing them in the format below. You can see it in the html code of your blog if you look at it in Edit Html mode; it will look something like this: <a href="http://2.bp.blogspot.com/ _AVxLoZ0mR_0/Rb_W1nLeYQI/AAAAAAAAAIg/ qCR5JYhLf6o/s1600-h/dgblues.jpg"> <img id="BLOGGER_PHOTO_ID_ 5025971925707284738" style=" DISPLAY:block; MARGIN: 0px auto 10px; CURSOR: hand; TEXT-ALIGN: center"alt="" src="http://2.bp.blogspot.com/_AVxLoZ0mR_0/ rb_W1nLeYQI/AAAAAAAAAIg/qCR5JYhLf6o/ s400/dgblues.jpg" border="0" /></a> If you click the small image (the blue text above) you'll see the large photo (red text above), otherwise the small image is already showing. END. |
Sunday, December 14, 2008
Move (Re-locate) Photos in a Post
| Most photos get loaded at the top of the post. I am not aware of any way to "point" with the cursor or otherwise assign the photo being uploaded a specific position in a post. The photo or image can, of course, be moved after it has been uploaded. Below are two methods for changing the photo position(s): In Compose mode you can see the photos. You can relocate the image by dragging and dropping it. In Edit Html mode you will see the code for the photos and will have to use Preview (or switch to the Compose mode) to see images. You can move it by using Cut and Paste on the code. If Compose tab is missing, you might have to go to Settings to activate it or it may be that you need to Refresh (F5) or clear your cache and cookies to make the link/icon visible again. |
Also of value, consider Table for Horizontal Photos In Post .
Sunday, December 07, 2008
Placing Photos in your Post
| Every photo you upload will go on top of your post and you have to move them "by hand" if you want them in special locations. You can move the photos where you want them AFTER you upload them (use either drag-and-drop with the mouse or "cut" the html photo code and then paste it into the correct location or sequence. |
Saturday, November 17, 2007
Table for Horizontal Photos In Post
| Ronald | Southern |
|---|---|
 | |
Haven't done any of those in a while. Tedious.
Below is the code that makes a small table like the one above have photos side by side:[Those of you wishing to cut to the chase quickly, start reading the large yellow-highlight area below, which is below the fourth straight red line.]
<center><table border=4 width=95%><tr><th align=center>Ronald</th> <th align=center>Southern</th></tr><tr><td><img src=\"https://blogger.googleusercontent.com/img/b/R29vZ2xl/AVvXsEhzaOEgOjpEK1oRv_I88gykcbl-wVKUiaG4nUQTbzGx7OYC3F7ugr-QGGpk7nkrUl9CmLjxGYJeuuwlbY_sHmShNTEHKfSvwho-qveJ9aXts9OR9qeLwErBJvBpwa4pmQ1LeSFP/s1600/twinkiebite.gif\" /> </td> <td><img src=\"https://blogger.googleusercontent.com/img/b/R29vZ2xl/AVvXsEhzaOEgOjpEK1oRv_I88gykcbl-wVKUiaG4nUQTbzGx7OYC3F7ugr-QGGpk7nkrUl9CmLjxGYJeuuwlbY_sHmShNTEHKfSvwho-qveJ9aXts9OR9qeLwErBJvBpwa4pmQ1LeSFP/s1600/twinkiebite.gif\" /> </td></tr></table> </center>
[More below...]
A MORE SIMPLISTIC SAMPLE OF A TABLE (followed by its code) is shown below:
| PICTURE | OR TEXT |
<table border=2>
<tr>
<td>PICTURE</td>
<td>OR TEXT</td>
</tr>
</table>
PREVENT LINE BREAKS:
In order for the Table not to cause extra line breaks in Blogger posts, there are two methods:
Method #1: You may need to copy it out like this (no line breaks of your own):
<table border=2><tr><td>PICTURE</td><td>OR TEXT</td></tr></table>
--To create additional row(s), add another set of "table records" such as
<tr><td>picture or text</td></tr>
as needed. Place them after the first table record and before the end tag, </table>.
--Remember that the photos cannot exceed the width of the area where you are placing them or else it will create problems, probably your sidebar being pushed down.
Method #2: This is something I've tried a number of times now. It does seem to be very effective, especially if you're going to use tables often. It is not good, though, for creating a table around a list (numbered or otherwise) because it will remove the page breaks and show the list as if it's a regular paragraph. It'll make the info resemble a traffic jam. This method makes the change in this way, using css:
Table Formatting In CSS
My explanation of the Table Formatting (Method #2) which I learned from the site above is as follows--changing the table in the CSS: |
Friday, October 19, 2007
Find Width of Header For New Image
| Header Width |
|---|
| This will tell you places to look for the width of your header. The image you want to place there should not exceed that. You should use a photo program to alter the width of your image BEFORE you upload it to your photo host (whether Blogger or otherwise). To find the width of the header 1. Click Template 2. Click Edit Html 3. Scroll down to the header,header-wrapper, or wrap code and look for the WIDTH parameter. 4. If not found, look for outer-wrapper and see it's width. It will look something like this : #outer-wrapper { width: 1000px; } |
Or you could adjust the same WIDTH in the template CSS
If you are unwilling to fuss with making your photo width match the width of the header, you could try this. You might find some code like the one above or this one below showing the #wrap; change the width of 100px to 900, 850, or so until it begins to look acceptable to you. Don't Save until then. If your photo just wasn't nearly wide enough, it may still look odd (short) to some eyes. Actually adjusting the width of your image in a photo program would then be the better choice.
| Another possible location of header width: #wrap { margin: 10px auto 0px; padding: 0px 5px; width: 900px; text-align:left; } |
END.
Thursday, October 11, 2007
Centering Header Image
| A. First try making the image the right size |
|---|
| To center image in the header, use a photo program to resize the width of the image to fit the size of the header. To find the width of the header 1. Click Template 2. Click Edit Html 3. Scroll down to the header,header-wrapper, or wrap code and look for the WIDTH parameter. 4. If not found, look for outer-wrapper and see it's width. It will look something like this : #outer-wrapper { width: 1000px; } |
[More below...]
| B. Or you could adjust the same WIDTH in the template CSS |
|---|
| If you are unwilling to fuss with making your photo width match the width of the header, you could try this. You might find some code like the one above or this one below; change the width of 100px to 900, 850, or so until it begins to look acceptable to you. Don't Save until then. If your photo just wasn't nearly wide enough, it may still look odd (short) to some eyes. Selection A would then be the better choice. #wrap { margin: 10px auto 0px; padding: 0px 5px; width: 1000px; text-align:left; } |
Hopefully you made a safety copy of your template before you started monkeying with the code or making any changes--you know, in case all hell breaks loose and you need to rescue yourself!
Sunday, September 30, 2007
Create a URL For Your Profile Pic
How to get a URL for an "About Me" photo that is only on your computer at present
END.
| Another Didactic List |
|---|
| 1. If you need to alter the photo size, use a photo program to do so while it's still on your computer. 2. Use a blog post (on your main blog or some other) and use the photo icon (in the toolbar above the Edit Post text box) to add a photo. 3. You'll Browse your own computer, select one, and upload it to that post. 4. When you've completed that, you'll have a lot of code for a large and small photo pair, part of which ("http://... etc.) is the URL. 5. Save that post, but it's not necessary to publish it. 6. Use the right-click menu on the mouse to Copy the URL. 7. You can later Paste it into the "Photo URL" box in your blog's Edit Profile list. 8. Be sure to save the change at the bottom of the Edit Profile page. |
If you use Blogger's picture icon or otherwise end up with the code for both large and small images, go here to unscramble the text and select the code for the smaller one at Header Picture Code.
END.
Saturday, September 08, 2007
Trouble Posting Photos
A lot of people have that trouble at times, but also a lot do not. Hard to know any simple solution. If possible, change (even if temporarily) to another browser. Sometimes IE6 or IE7 will do a better job, sometimes Firefox or others will work better. If it gets the job done, you can then switch back to whatever you're used to. Or, there's no reason why you can't have one browser open in one window while you open another window for a second browser--you can alternate between them.
If you've been trying to add an image to text, make a new post and see what happens when you do it the other way around: add the text last. Or (again) do it the other way around! Don't treat it like a household problem, treat it like War! Try everything! All is fair! Click the Home and End buttons on your keyboard. You might even keep a Fake Blog around and try sending the photos to a post there.If that works, copy the html code and then paste it in where you want it.
END.
| There are alternate free photo hosts such as Picasa, Photobucket, Flickr, etc. With some of them, costs may ensue if you exceed their limits. Try any of them, though, as alternatives when your photo host is troublesome. One may work when another one does not. Try it! |
If you've been trying to add an image to text, make a new post and see what happens when you do it the other way around: add the text last. Or (again) do it the other way around! Don't treat it like a household problem, treat it like War! Try everything! All is fair! Click the Home and End buttons on your keyboard. You might even keep a Fake Blog around and try sending the photos to a post there.If that works, copy the html code and then paste it in where you want it.
Also see my Emergency Steps at the top of this blog for some general info about things not working.
END.
Sunday, July 08, 2007
Header Picture Code
Unscrambling Blogger photo code for Header picture code
Blogger's picture icon is good for regular pictures in the post or in the sidebar, but it's overdone for the purpose of putting a photo in your header. You don't need both large and small versions for the header.
What Blogger may give you when you upload the photo to a post (Save it, but don't Publish it!) will resemble this:
<a href="https://blogger.googleusercontent.com/img/b/R29vZ2xl/AVvXsEiW0WfYsy_i4SwyaYumkQqxeLUFNu54pRYjaZfSPrMVvC1TPTUd7jd65bUanoyRQUUy5h3wInYtFVCoSkf5Co99QUH5n6v9_ZBhOF9fr-fIX6vW0oLQm-kfyfZnyJBk1p1KXlBU/s1600-h/dgblues.jpg"><img id="BLOGGER_PHOTO_ID_5025971925707284738" style="DISPLAY: block; MARGIN: 0px auto 10px; CURSOR: hand; TEXT-ALIGN: center" alt="" src="https://blogger.googleusercontent.com/img/b/R29vZ2xl/AVvXsEiW0WfYsy_i4SwyaYumkQqxeLUFNu54pRYjaZfSPrMVvC1TPTUd7jd65bUanoyRQUUy5h3wInYtFVCoSkf5Co99QUH5n6v9_ZBhOF9fr-fIX6vW0oLQm-kfyfZnyJBk1p1KXlBU/s400/dgblues.jpg" border="0" /></a>
What you would need to extract is this:
https://blogger.googleusercontent.com/img/b/R29vZ2xl/AVvXsEiW0WfYsy_i4SwyaYumkQqxeLUFNu54pRYjaZfSPrMVvC1TPTUd7jd65bUanoyRQUUy5h3wInYtFVCoSkf5Co99QUH5n6v9_ZBhOF9fr-fIX6vW0oLQm-kfyfZnyJBk1p1KXlBU/s1600/dgblues.jpg
If you didn't notice on your own, the difference between the red code at the top and the red code above this paragraph is that the -h has been deleted after S1600.
SMALL IMAGE: The url contained in the blue text (marked S400) is the smaller of the images and will need no correction--just the code, such as this, shown above:
https://blogger.googleusercontent.com/img/b/R29vZ2xl/AVvXsEiW0WfYsy_i4SwyaYumkQqxeLUFNu54pRYjaZfSPrMVvC1TPTUd7jd65bUanoyRQUUy5h3wInYtFVCoSkf5Co99QUH5n6v9_ZBhOF9fr-fIX6vW0oLQm-kfyfZnyJBk1p1KXlBU/s400/dgblues.jpg
END.
Blogger's picture icon is good for regular pictures in the post or in the sidebar, but it's overdone for the purpose of putting a photo in your header. You don't need both large and small versions for the header.
What Blogger may give you when you upload the photo to a post (Save it, but don't Publish it!) will resemble this:
<a href="https://blogger.googleusercontent.com/img/b/R29vZ2xl/AVvXsEiW0WfYsy_i4SwyaYumkQqxeLUFNu54pRYjaZfSPrMVvC1TPTUd7jd65bUanoyRQUUy5h3wInYtFVCoSkf5Co99QUH5n6v9_ZBhOF9fr-fIX6vW0oLQm-kfyfZnyJBk1p1KXlBU/s1600-h/dgblues.jpg"><img id="BLOGGER_PHOTO_ID_5025971925707284738" style="DISPLAY: block; MARGIN: 0px auto 10px; CURSOR: hand; TEXT-ALIGN: center" alt="" src="https://blogger.googleusercontent.com/img/b/R29vZ2xl/AVvXsEiW0WfYsy_i4SwyaYumkQqxeLUFNu54pRYjaZfSPrMVvC1TPTUd7jd65bUanoyRQUUy5h3wInYtFVCoSkf5Co99QUH5n6v9_ZBhOF9fr-fIX6vW0oLQm-kfyfZnyJBk1p1KXlBU/s400/dgblues.jpg" border="0" /></a>
What you would need to extract is this:
https://blogger.googleusercontent.com/img/b/R29vZ2xl/AVvXsEiW0WfYsy_i4SwyaYumkQqxeLUFNu54pRYjaZfSPrMVvC1TPTUd7jd65bUanoyRQUUy5h3wInYtFVCoSkf5Co99QUH5n6v9_ZBhOF9fr-fIX6vW0oLQm-kfyfZnyJBk1p1KXlBU/s1600/dgblues.jpg
If you didn't notice on your own, the difference between the red code at the top and the red code above this paragraph is that the -h has been deleted after S1600.
SMALL IMAGE: The url contained in the blue text (marked S400) is the smaller of the images and will need no correction--just the code, such as this, shown above:
https://blogger.googleusercontent.com/img/b/R29vZ2xl/AVvXsEiW0WfYsy_i4SwyaYumkQqxeLUFNu54pRYjaZfSPrMVvC1TPTUd7jd65bUanoyRQUUy5h3wInYtFVCoSkf5Co99QUH5n6v9_ZBhOF9fr-fIX6vW0oLQm-kfyfZnyJBk1p1KXlBU/s400/dgblues.jpg
Assuming that the S400 is actually small and not just less than the large one, you could enter that code, as shown, into the Photo Url as your Profile Photo.
END.
Friday, April 06, 2007
Screenshots In Blogger
How Screenshots Are Done
I used to back away from screenshots in Blogger, though I was not uncomfortable with adding photos the regular way. Now I don't run away like that! If you've never done one, this is how:
END.
I used to back away from screenshots in Blogger, though I was not uncomfortable with adding photos the regular way. Now I don't run away like that! If you've never done one, this is how:
|
END.
Subscribe to:
Posts (Atom)


