
| When the blog header image you decided you don't like after all won't let itself be removed, what are you supposed to do? People say their photo is stuck there and won't be removed! I believe them, but I've barely had it happen to me, so my experience has been of small proportions! I only had a stuck header image once. What did I do? I panicked, of course. WHAT was it doing? So I tried everything that I ever heard of or could vaguely imagine might work!.
I did break it loose at last, but not before I'd gotten so flustered that I very unscientifically lost track of the order in which I did all these things. I can't even guess which one really "fixed" it. I nearly feel that it just gave up when it saw how hard I was going to work at it! (You can see how insensible it made me!!!)
After either the short or the long list, I can only hope that you can finally remove the header image (replace it, too, if that's what you'd meant to do!). In my case, I ended up with a new Header Gadget with no image as I'd expected. I was then able to put a new image in the header, remove it, replace it (just to see if it would!). But I had no way of knowing that if it had originally been stuck, would the next attempt to add an image also stick?! This may be the problem, the "rub"--I had to test this (all 3 times) without a "stuck" header! So I wish you great Good Luck. You may learn a number of new things, but I can't promise any success! If anyone tries this, let me know if it fails or succeeds! |
Showing posts with label image. Show all posts
Showing posts with label image. Show all posts
Friday, May 29, 2009
When Header Image is Stuck, Won't "Remove"



Thursday, February 12, 2009
How To Post Photos
The most direct way to get photos on your post is to use Blogger's picture icon:
There are alternate free photo hosts such as Picasa, Photobucket, Flickr, etc. With some of them, costs may ensue if you exceed their limits. Try any of them, though, as alternatives when your photo host is troublesome. One may work when another one does not.
There are several useful screenshots below!
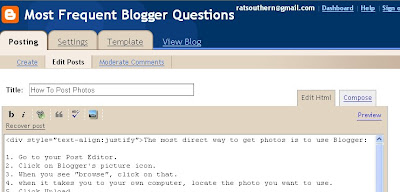
First is a screenshot of the top part of this post in the Post Editor. It shows the Blogger picture icon, the tiny rectangle that's blue in the top half, and primarily green in the bottom half.]
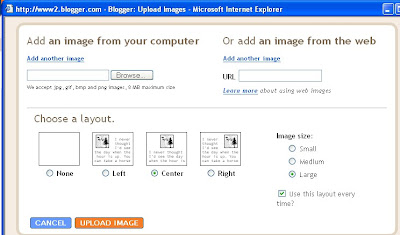
[Below are screen shots of the photo download process.]
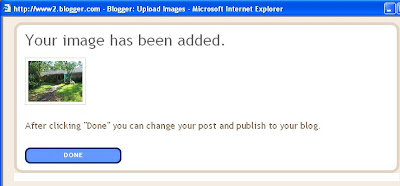
New images always load into a post at the top. If you view the image in Compose mode, you can Drag and Drop it to other locations; if you are viewing it in Edit Html mode, use Cut and Paste to relocate it.
END.
| 1. Go to your Post Editor. 2. Click on Blogger's picture icon. 3. When you see "browse", click on that. 4. when it takes you to your own computer, locate the photo you want to use. 5. Click Upload. 6. Click on Done. 7. If you uploaded to a post different from where it's intended to go, possibly even on a different blog, Copy the html code. 8. Paste the code into the right post. |
There are alternate free photo hosts such as Picasa, Photobucket, Flickr, etc. With some of them, costs may ensue if you exceed their limits. Try any of them, though, as alternatives when your photo host is troublesome. One may work when another one does not.
There are several useful screenshots below!
[More below...Screenshots]
First is a screenshot of the top part of this post in the Post Editor. It shows the Blogger picture icon, the tiny rectangle that's blue in the top half, and primarily green in the bottom half.]

[Below are screen shots of the photo download process.]


New images always load into a post at the top. If you view the image in Compose mode, you can Drag and Drop it to other locations; if you are viewing it in Edit Html mode, use Cut and Paste to relocate it.
END.
Sunday, January 18, 2009
Small/Large Photos
| "How do I get my pictures to enlarge when I click on them?" I don't keep track of all the other photo hosts, but Blogger downloads your photo in a sort of dual system so that a small image is made that fits the area (post or sidebar) and then you can click on it for the full-size large version. I used to do the same thing by hand when I made my own web sites by making both a small and large version of a picture and placing them in the format below. You can see it in the html code of your blog if you look at it in Edit Html mode; it will look something like this: <a href="http://2.bp.blogspot.com/ _AVxLoZ0mR_0/Rb_W1nLeYQI/AAAAAAAAAIg/ qCR5JYhLf6o/s1600-h/dgblues.jpg"> <img id="BLOGGER_PHOTO_ID_ 5025971925707284738" style=" DISPLAY:block; MARGIN: 0px auto 10px; CURSOR: hand; TEXT-ALIGN: center"alt="" src="http://2.bp.blogspot.com/_AVxLoZ0mR_0/ rb_W1nLeYQI/AAAAAAAAAIg/qCR5JYhLf6o/ s400/dgblues.jpg" border="0" /></a> If you click the small image (the blue text above) you'll see the large photo (red text above), otherwise the small image is already showing. END. |
Friday, October 19, 2007
Find Width of Header For New Image
| Header Width |
|---|
| This will tell you places to look for the width of your header. The image you want to place there should not exceed that. You should use a photo program to alter the width of your image BEFORE you upload it to your photo host (whether Blogger or otherwise). To find the width of the header 1. Click Template 2. Click Edit Html 3. Scroll down to the header,header-wrapper, or wrap code and look for the WIDTH parameter. 4. If not found, look for outer-wrapper and see it's width. It will look something like this : #outer-wrapper { width: 1000px; } |
Or you could adjust the same WIDTH in the template CSS
If you are unwilling to fuss with making your photo width match the width of the header, you could try this. You might find some code like the one above or this one below showing the #wrap; change the width of 100px to 900, 850, or so until it begins to look acceptable to you. Don't Save until then. If your photo just wasn't nearly wide enough, it may still look odd (short) to some eyes. Actually adjusting the width of your image in a photo program would then be the better choice.
| Another possible location of header width: #wrap { margin: 10px auto 0px; padding: 0px 5px; width: 900px; text-align:left; } |
END.
Thursday, October 11, 2007
Centering Header Image
| A. First try making the image the right size |
|---|
| To center image in the header, use a photo program to resize the width of the image to fit the size of the header. To find the width of the header 1. Click Template 2. Click Edit Html 3. Scroll down to the header,header-wrapper, or wrap code and look for the WIDTH parameter. 4. If not found, look for outer-wrapper and see it's width. It will look something like this : #outer-wrapper { width: 1000px; } |
[More below...]
| B. Or you could adjust the same WIDTH in the template CSS |
|---|
| If you are unwilling to fuss with making your photo width match the width of the header, you could try this. You might find some code like the one above or this one below; change the width of 100px to 900, 850, or so until it begins to look acceptable to you. Don't Save until then. If your photo just wasn't nearly wide enough, it may still look odd (short) to some eyes. Selection A would then be the better choice. #wrap { margin: 10px auto 0px; padding: 0px 5px; width: 1000px; text-align:left; } |
Hopefully you made a safety copy of your template before you started monkeying with the code or making any changes--you know, in case all hell breaks loose and you need to rescue yourself!
Saturday, September 08, 2007
Trouble Posting Photos
A lot of people have that trouble at times, but also a lot do not. Hard to know any simple solution. If possible, change (even if temporarily) to another browser. Sometimes IE6 or IE7 will do a better job, sometimes Firefox or others will work better. If it gets the job done, you can then switch back to whatever you're used to. Or, there's no reason why you can't have one browser open in one window while you open another window for a second browser--you can alternate between them.
If you've been trying to add an image to text, make a new post and see what happens when you do it the other way around: add the text last. Or (again) do it the other way around! Don't treat it like a household problem, treat it like War! Try everything! All is fair! Click the Home and End buttons on your keyboard. You might even keep a Fake Blog around and try sending the photos to a post there.If that works, copy the html code and then paste it in where you want it.
END.
| There are alternate free photo hosts such as Picasa, Photobucket, Flickr, etc. With some of them, costs may ensue if you exceed their limits. Try any of them, though, as alternatives when your photo host is troublesome. One may work when another one does not. Try it! |
If you've been trying to add an image to text, make a new post and see what happens when you do it the other way around: add the text last. Or (again) do it the other way around! Don't treat it like a household problem, treat it like War! Try everything! All is fair! Click the Home and End buttons on your keyboard. You might even keep a Fake Blog around and try sending the photos to a post there.If that works, copy the html code and then paste it in where you want it.
Also see my Emergency Steps at the top of this blog for some general info about things not working.
END.
Sunday, July 08, 2007
Header Picture Code
Unscrambling Blogger photo code for Header picture code
Blogger's picture icon is good for regular pictures in the post or in the sidebar, but it's overdone for the purpose of putting a photo in your header. You don't need both large and small versions for the header.
What Blogger may give you when you upload the photo to a post (Save it, but don't Publish it!) will resemble this:
<a href="https://blogger.googleusercontent.com/img/b/R29vZ2xl/AVvXsEiW0WfYsy_i4SwyaYumkQqxeLUFNu54pRYjaZfSPrMVvC1TPTUd7jd65bUanoyRQUUy5h3wInYtFVCoSkf5Co99QUH5n6v9_ZBhOF9fr-fIX6vW0oLQm-kfyfZnyJBk1p1KXlBU/s1600-h/dgblues.jpg"><img id="BLOGGER_PHOTO_ID_5025971925707284738" style="DISPLAY: block; MARGIN: 0px auto 10px; CURSOR: hand; TEXT-ALIGN: center" alt="" src="https://blogger.googleusercontent.com/img/b/R29vZ2xl/AVvXsEiW0WfYsy_i4SwyaYumkQqxeLUFNu54pRYjaZfSPrMVvC1TPTUd7jd65bUanoyRQUUy5h3wInYtFVCoSkf5Co99QUH5n6v9_ZBhOF9fr-fIX6vW0oLQm-kfyfZnyJBk1p1KXlBU/s400/dgblues.jpg" border="0" /></a>
What you would need to extract is this:
https://blogger.googleusercontent.com/img/b/R29vZ2xl/AVvXsEiW0WfYsy_i4SwyaYumkQqxeLUFNu54pRYjaZfSPrMVvC1TPTUd7jd65bUanoyRQUUy5h3wInYtFVCoSkf5Co99QUH5n6v9_ZBhOF9fr-fIX6vW0oLQm-kfyfZnyJBk1p1KXlBU/s1600/dgblues.jpg
If you didn't notice on your own, the difference between the red code at the top and the red code above this paragraph is that the -h has been deleted after S1600.
SMALL IMAGE: The url contained in the blue text (marked S400) is the smaller of the images and will need no correction--just the code, such as this, shown above:
https://blogger.googleusercontent.com/img/b/R29vZ2xl/AVvXsEiW0WfYsy_i4SwyaYumkQqxeLUFNu54pRYjaZfSPrMVvC1TPTUd7jd65bUanoyRQUUy5h3wInYtFVCoSkf5Co99QUH5n6v9_ZBhOF9fr-fIX6vW0oLQm-kfyfZnyJBk1p1KXlBU/s400/dgblues.jpg
END.
Blogger's picture icon is good for regular pictures in the post or in the sidebar, but it's overdone for the purpose of putting a photo in your header. You don't need both large and small versions for the header.
What Blogger may give you when you upload the photo to a post (Save it, but don't Publish it!) will resemble this:
<a href="https://blogger.googleusercontent.com/img/b/R29vZ2xl/AVvXsEiW0WfYsy_i4SwyaYumkQqxeLUFNu54pRYjaZfSPrMVvC1TPTUd7jd65bUanoyRQUUy5h3wInYtFVCoSkf5Co99QUH5n6v9_ZBhOF9fr-fIX6vW0oLQm-kfyfZnyJBk1p1KXlBU/s1600-h/dgblues.jpg"><img id="BLOGGER_PHOTO_ID_5025971925707284738" style="DISPLAY: block; MARGIN: 0px auto 10px; CURSOR: hand; TEXT-ALIGN: center" alt="" src="https://blogger.googleusercontent.com/img/b/R29vZ2xl/AVvXsEiW0WfYsy_i4SwyaYumkQqxeLUFNu54pRYjaZfSPrMVvC1TPTUd7jd65bUanoyRQUUy5h3wInYtFVCoSkf5Co99QUH5n6v9_ZBhOF9fr-fIX6vW0oLQm-kfyfZnyJBk1p1KXlBU/s400/dgblues.jpg" border="0" /></a>
What you would need to extract is this:
https://blogger.googleusercontent.com/img/b/R29vZ2xl/AVvXsEiW0WfYsy_i4SwyaYumkQqxeLUFNu54pRYjaZfSPrMVvC1TPTUd7jd65bUanoyRQUUy5h3wInYtFVCoSkf5Co99QUH5n6v9_ZBhOF9fr-fIX6vW0oLQm-kfyfZnyJBk1p1KXlBU/s1600/dgblues.jpg
If you didn't notice on your own, the difference between the red code at the top and the red code above this paragraph is that the -h has been deleted after S1600.
SMALL IMAGE: The url contained in the blue text (marked S400) is the smaller of the images and will need no correction--just the code, such as this, shown above:
https://blogger.googleusercontent.com/img/b/R29vZ2xl/AVvXsEiW0WfYsy_i4SwyaYumkQqxeLUFNu54pRYjaZfSPrMVvC1TPTUd7jd65bUanoyRQUUy5h3wInYtFVCoSkf5Co99QUH5n6v9_ZBhOF9fr-fIX6vW0oLQm-kfyfZnyJBk1p1KXlBU/s400/dgblues.jpg
Assuming that the S400 is actually small and not just less than the large one, you could enter that code, as shown, into the Photo Url as your Profile Photo.
END.
Monday, July 17, 2006
Scribe--additional words for links
If you're using the scribe template, thE script for the various titles is NOT a font, but each word is an graphic. You may want to know the following for further heading titles:
p.s. Every time I click on it, there's a glitch, a pause of a couple of seconds, that claims an "Internal Error" and then it goes on to the site. Be patient and it'll come up.
SCRIBE FONT, ADDITIONAL WORDS
p.s. Every time I click on it, there's a glitch, a pause of a couple of seconds, that claims an "Internal Error" and then it goes on to the site. Be patient and it'll come up.
SCRIBE FONT, ADDITIONAL WORDS
Subscribe to:
Posts (Atom)


